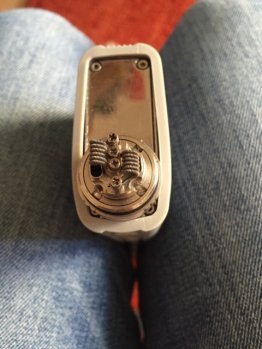
Best Billow V2 builds??

theyettie

Experienced Vaper
ECIGSSA Donor
LV
18
 
Joined
26/5/15
Posts
601
Awards
17
Age
38
Location
Cydonia
Alo.

I've been building on the Billow now for a couple of weeks but I can't seem to find a build I love. What I like is a nice, warm vape and ass tonnes of cloud... Hehe

Builds I've tried (keep in mind I only have Kanthal):

26gauge; 0.4ohm; 2mm ID
26gauge; 0.3ohm; 2mm ID
28gauge; 0.3ohm; 2mm ID
28gauge; 0.3ohm; 2.5mm ID

What am I missing? Last night I built the last setup, hoping that I'd get my Sigelei 150 up to around 40/50W, but I get dry hits from 28W upwards. Wicking with Japanese Organic Cotton. Wicked as lightly as possible...
 
Try put a duel 32 over 24 clapton 2.5mm 5 wrap good flavor nice warmth
Comes to about 0.19 ohms


Sent from my iPhone using Tapatalk
 
Hey buddy

It's 99% the wicking that's giving you an issue.

I don't have my billow here with me but I can do a rebuild on the goblin and point you in the right direction.

Give me a few min :)
 
The semi-universal tank build :)
Start of by making sure your coils are centered on the deck and above the air holes. I prefer at a medium height

Both coils must fire at the same time otherwise it's going to lead to problems

4d2a669885af39a224829bf9f5bb5006.jpg


Gently roll your cotton and then tightly pinch and roll one side into a pointy bit. This pointy bit must be longer than your coil.

For 2.5 to 3mm id you can cut a piece of cotton bacon v2 and then separate it into 4 parts. Each part is the average diameter you should be using for a coil.

The most crucial part is that the cotton must be tight within the coil. If you bend the cotton downwards and see a gap then you headed down to dry hit city!


a120d4544593e3aba1a4339d0e135a1e.jpg


This is an example of the gap

6fafebf231539ab0fa149a111f52629a.jpg


Cut the cotton to the length of the atty . There will be more cutting involved but this will make it a lot easier

032209da10bc161ad9707c9ff3303919.jpg


Comb the ends with a piece of wire to get it all neat and for there to be no roadblocks. Imagine the juice flowing freely up the nicely combed Fibres :)

085ce700575c65aa8c83e58664082c7c.jpg


Once combed , trip off the scraggly bits and then shape the wick into the "bow tie " position

ab3c80608e7592fc01878d3314316d1e.jpg


Make a 45 degree cut in this direction / this will result in the tail that will go into the juice channel

fd18bd4588e3c70598b7c626ac09c460.jpg


Cut all wicks and the juice it up . Then push the wicks into the juice channel . It should easily fit . If it bulges then give it another trim

9013a55889760a93aa261128a8e5c39b.jpg


Once tucked in then gently lift them out again but they should keep the shape of the juice channel

322d024e10ab31692f5a31b3768f9c7c.jpg


The billow has a little notch halfway down the juice Channel. That is the tail end measurement. Trim the wick to that height

fde4b1dbcb0dd2cef1d19d5611cdc6bd.jpg


Push it back into the juice channel, juice it up again, assemble tank and then fill up !!!


Sent from my iPhone using Tapatalk
 
@shaunnadan , that was classic!
Excellent tutorial and great photos
I loved the way you showed the gap if you dont put in enough wick!
 
When I first got my Billow v2 nano I got a whole boat load full of dry hits and could not for the life of me figure out what I did wrong with the wicking! I then stumbled upon a short video on youtube that sorted my problems out! The key to not getting dry hits is where the tutorial above hits the nail on the head, is to cut your wick shorter and push it into the notch in the juice channel. That will sort it all out!

Awesome tutorial @shaunnadan! I wish I knew how easy it was when I first got it!

Sent from my SM-G928F using Tapatalk
 
@shaunnadan , that was classic!
Excellent tutorial and great photos
I loved the way you showed the gap if you dont put in enough wick!

Thanks :)

I was called some colorful words once regarding that gap. I promptly learnt the correct way to wick a coil and it's been smooth sailing ever since
 
When I first got my Billow v2 nano I got a whole boat load full of dry hits and could not for the life of me figure out what I did wrong with the wicking! I then stumbled upon a short video on youtube that sorted my problems out! The key to not getting dry hits is where the tutorial above hits the nail on the head, is to cut your wick shorter and push it into the notch in the juice channel. That will sort it all out!

Awesome tutorial @shaunnadan! I wish I knew how easy it was when I first got it!

Sent from my SM-G928F using Tapatalk

Wicking a kayfun and goblin have taught me the art of wicking.

It's much longer but foolproof. I no longer look at build videos when I get a tank. Just looking at the deck gives me a good idea of what the wicking should be
 
Back
Top