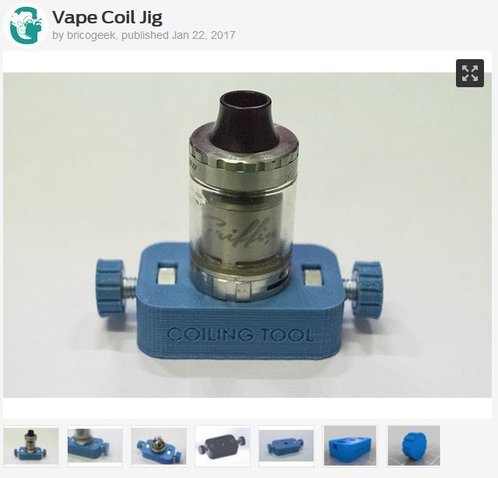
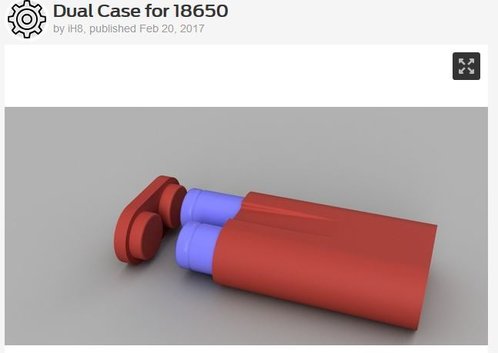
cool .. just remember i will supply the printed parts as they are, on functionality i can not comment
Navigation
Install the app
How to install the app on iOS
Follow along with the video below to see how to install our site as a web app on your home screen.

Note: this_feature_currently_requires_accessing_site_using_safari
More options
You are using an out of date browser. It may not display this or other websites correctly.
You should upgrade or use an alternative browser.
You should upgrade or use an alternative browser.
That is for sure the most useful thing I can imagine! Very tempted! Now to see what else I may need
What would be awesome is a spacer / reducer to fill the cup holder of a car with a cutout in the middle for the mod! No more rattling mod that makes me worry about the paint job! Hmm...
That is no problem, But some cars have a tapered hole and some just a small difference in size. Also to get the measurements of your mods and soWhat would be awesome is a spacer / reducer to fill the cup holder of a car with a cutout in the middle for the mod! No more rattling mod that makes me worry about the paint job! Hmm...
Just got my Clapton rig from @kimbo and I'm rather pleased with it. Took it for a test run and cranked out a 26ga SS Claptoned with 32ga Ni80 in no time flat. It's very easy to use once you get the hang of it and tension the spool correctly. Now of course I'm getting cocky and want to try a fused Clapton. 
Just got my Clapton rig from @kimbo and I'm rather pleased with it. Took it for a test run and cranked out a 26ga SS Claptoned with 32ga Ni80 in no time flat. It's very easy to use once you get the hang of it and tension the spool correctly. Now of course I'm getting cocky and want to try a fused Clapton.
Thank you for the feedback @RichJB
I want one of these please.
Pm meI want one of these please.
Sent from my SM-G900F using Tapatalk
Just got my Clapton rig from @kimbo and I'm rather pleased with it. Took it for a test run and cranked out a 26ga SS Claptoned with 32ga Ni80 in no time flat. It's very easy to use once you get the hang of it and tension the spool correctly. Now of course I'm getting cocky and want to try a fused Clapton.
Thats super!
Show us a picture of the @RichJB clapton coiler in action!
Me and pics are tricky but @kimbo sent me a pic:
View attachment 92494
This jig works really well, making Claptons is very simple with it.
Will take your word for it @RichJB
All i see is a little blue object that looks quite strange
Hehe
They are objects of mystery until you know how they work. It requires years of study in a Tibetan monastery before you have the chi. 
Kimbo do u have a cell number i can get hold of u on? Alternatively my cell number is 0747868866 please whatsapp me so that i may place some orders
Sent from my SM-G935F using Tapatalk
Sent from my SM-G935F using Tapatalk
@Silver i held it and i have no idea how it is suppose to work mate lol
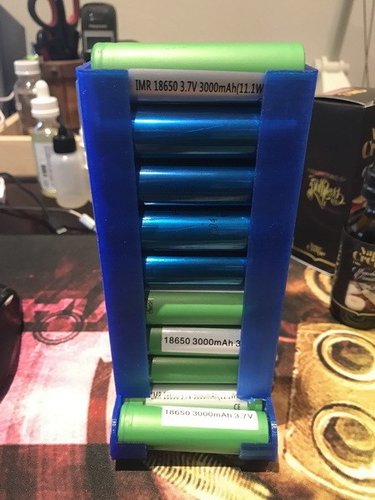
Morning @Rob Fisher looking now i see that the bottom battery is slightly up on the left side, there might be a small piece of support material there that is missed sorry
Morning @Rob Fisher looking now i see that the bottom battery is slightly up on the left side, there might be a small piece of support material there that is missed sorry
Yes there is... it's on my list of things to do.
For those who have a drill at home and would like to make Clapton wire, let me explain the mysteries of the Clapton jig.
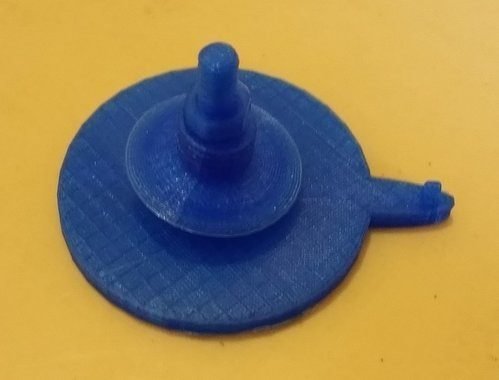
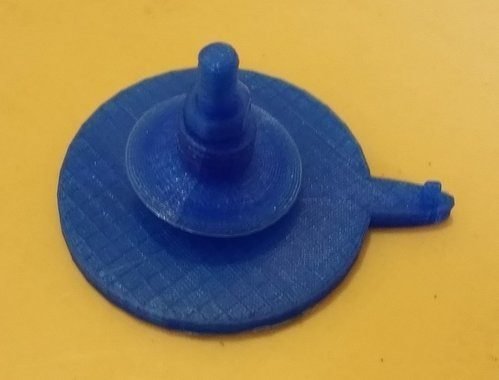
As you can see, the jig consists of a flat circular base that is roughly the same diameter as a spool of wire, a threaded vertical spindle and then a horizontal arm with a threading eye jutting out to the right in this pic. The kit also has a spool friction plate, several washers and a nut, which are all on the spindle in the pic.
To make a Clapton, place your Clapton wire spool (i.e. the smaller gauge wire for the Clapton wraps) onto the spindle. Fasten it down to the base using the friction plate, washers and nut and then adjust the tension so that you can pull wire off the spool but against firm resistance. This is the key. If the tension is too tight, the Clapton wire will snap. If it's not tight enough, you will get loose wraps.
The one detail which you can't see in this pic, and which is key to how the jig works, is that there is a small hole that runs through the base of the jig from L to R in the pic, emerging at the tip of the jutting arm. You thread your core wire through this hole, two core wires if you're doing fused Claptons. Then you thread your Clapton wire through the threading eye. When you have it set up, it will look like this:
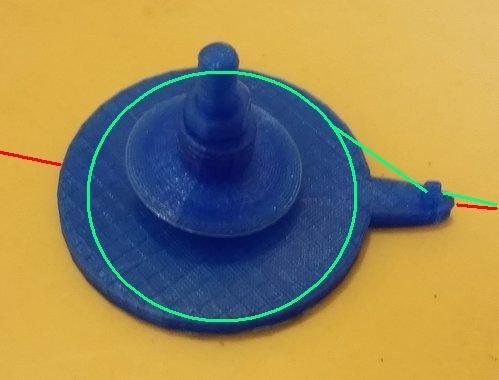
The red represents your core wire, the green the Clapton wire spool and wire. Attach the end of the core wire to your drill chuck (which will be on the right of this pic, naturally), wrap the Clapton wire around the core a couple of times and then also attach the end of the Clapton wire to the drill chuck. Snug the jig up as close to the drill as you can and laat waai. Do an inch or so to check that your wraps are tight, adjust tension if needed, and away you go.
The operation has to take place on a smooth surface like a table top. What happens is that, as the Clapton wire is wrapped, natural physics pushes the whole jig away from the drill end. So it runs smoothly backwards along the core wire, applying the Clapton wraps as it goes. Once you get to the end of the core wire, reverse the drill so that the Clapton wraps back on itself for a few turns to 'seal' the Clapton wraps. Easy peesy. With a bit of practice, you can wrap Claptons using just a drill and holding the wire/applying tension with your hand. But this is way easier. For the bargain price, really, it's chicken dinner all the way.

As you can see, the jig consists of a flat circular base that is roughly the same diameter as a spool of wire, a threaded vertical spindle and then a horizontal arm with a threading eye jutting out to the right in this pic. The kit also has a spool friction plate, several washers and a nut, which are all on the spindle in the pic.
To make a Clapton, place your Clapton wire spool (i.e. the smaller gauge wire for the Clapton wraps) onto the spindle. Fasten it down to the base using the friction plate, washers and nut and then adjust the tension so that you can pull wire off the spool but against firm resistance. This is the key. If the tension is too tight, the Clapton wire will snap. If it's not tight enough, you will get loose wraps.
The one detail which you can't see in this pic, and which is key to how the jig works, is that there is a small hole that runs through the base of the jig from L to R in the pic, emerging at the tip of the jutting arm. You thread your core wire through this hole, two core wires if you're doing fused Claptons. Then you thread your Clapton wire through the threading eye. When you have it set up, it will look like this:

The red represents your core wire, the green the Clapton wire spool and wire. Attach the end of the core wire to your drill chuck (which will be on the right of this pic, naturally), wrap the Clapton wire around the core a couple of times and then also attach the end of the Clapton wire to the drill chuck. Snug the jig up as close to the drill as you can and laat waai. Do an inch or so to check that your wraps are tight, adjust tension if needed, and away you go.
The operation has to take place on a smooth surface like a table top. What happens is that, as the Clapton wire is wrapped, natural physics pushes the whole jig away from the drill end. So it runs smoothly backwards along the core wire, applying the Clapton wraps as it goes. Once you get to the end of the core wire, reverse the drill so that the Clapton wraps back on itself for a few turns to 'seal' the Clapton wraps. Easy peesy. With a bit of practice, you can wrap Claptons using just a drill and holding the wire/applying tension with your hand. But this is way easier. For the bargain price, really, it's chicken dinner all the way.
For those who have a drill at home and would like to make Clapton wire, let me explain the mysteries of the Clapton jig.
View attachment 92540
As you can see, the jig consists of a flat circular base that is roughly the same diameter as a spool of wire, a threaded vertical spindle and then a horizontal arm with a threading eye jutting out to the right in this pic. The kit also has a spool friction plate, several washers and a nut, which are all on the spindle in the pic.
To make a Clapton, place your Clapton wire spool (i.e. the smaller gauge wire for the Clapton wraps) onto the spindle. Fasten it down to the base using the friction plate, washers and nut and then adjust the tension so that you can pull wire off the spool but against firm resistance. This is the key. If the tension is too tight, the Clapton wire will snap. If it's not tight enough, you will get loose wraps.
The one detail which you can't see in this pic, and which is key to how the jig works, is that there is a small hole that runs through the base of the jig from L to R in the pic, emerging at the tip of the jutting arm. You thread your core wire through this hole, two core wires if you're doing fused Claptons. Then you thread your Clapton wire through the threading eye. When you have it set up, it will look like this:
View attachment 92553
The red represents your core wire, the green the Clapton wire spool and wire. Attach the end of the core wire to your drill chuck (which will be on the right of this pic, naturally), wrap the Clapton wire around the core a couple of times and then also attach the end of the Clapton wire to the drill chuck. Snug the jig up as close to the drill as you can and laat waai. Do an inch or so to check that your wraps are tight, adjust tension if needed, and away you go.
The operation has to take place on a smooth surface like a table top. What happens is that, as the Clapton wire is wrapped, natural physics pushes the whole jig away from the drill end. So it runs smoothly backwards along the core wire, applying the Clapton wraps as it goes. Once you get to the end of the core wire, reverse the drill so that the Clapton wraps back on itself for a few turns to 'seal' the Clapton wraps. Easy peesy. With a bit of practice, you can wrap Claptons using just a drill and holding the wire/applying tension with your hand. But this is way easier. For the bargain price, really, it's chicken dinner all the way.
this man speaks in tongues
For those who have a drill at home and would like to make Clapton wire, let me explain the mysteries of the Clapton jig.
View attachment 92540
As you can see, the jig consists of a flat circular base that is roughly the same diameter as a spool of wire, a threaded vertical spindle and then a horizontal arm with a threading eye jutting out to the right in this pic. The kit also has a spool friction plate, several washers and a nut, which are all on the spindle in the pic.
To make a Clapton, place your Clapton wire spool (i.e. the smaller gauge wire for the Clapton wraps) onto the spindle. Fasten it down to the base using the friction plate, washers and nut and then adjust the tension so that you can pull wire off the spool but against firm resistance. This is the key. If the tension is too tight, the Clapton wire will snap. If it's not tight enough, you will get loose wraps.
The one detail which you can't see in this pic, and which is key to how the jig works, is that there is a small hole that runs through the base of the jig from L to R in the pic, emerging at the tip of the jutting arm. You thread your core wire through this hole, two core wires if you're doing fused Claptons. Then you thread your Clapton wire through the threading eye. When you have it set up, it will look like this:
View attachment 92553
The red represents your core wire, the green the Clapton wire spool and wire. Attach the end of the core wire to your drill chuck (which will be on the right of this pic, naturally), wrap the Clapton wire around the core a couple of times and then also attach the end of the Clapton wire to the drill chuck. Snug the jig up as close to the drill as you can and laat waai. Do an inch or so to check that your wraps are tight, adjust tension if needed, and away you go.
The operation has to take place on a smooth surface like a table top. What happens is that, as the Clapton wire is wrapped, natural physics pushes the whole jig away from the drill end. So it runs smoothly backwards along the core wire, applying the Clapton wraps as it goes. Once you get to the end of the core wire, reverse the drill so that the Clapton wraps back on itself for a few turns to 'seal' the Clapton wraps. Easy peesy. With a bit of practice, you can wrap Claptons using just a drill and holding the wire/applying tension with your hand. But this is way easier. For the bargain price, really, it's chicken dinner all the way.
Superb explanation @RichJB !!
Thanks for that
No more mystery - makes great sense - wow, what a cool jig
Similar threads
- Replies
- 5
- Views
- 1K
- Replies
- 1
- Views
- 102
- Replies
- 9
- Views
- 325


