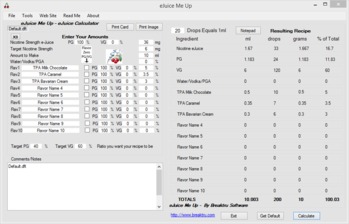
So a while back I posted about DIY without the need for an e-liquid calculator. It is pretty straight forward, but not 100% accurate.
So I thought it was about time to help explain the e-liquid calculators for those of you that want to be pretty much 100% accurate with your mixes because your OCD is just killing you
They are actually pretty easy as well, it is just a bit confusing at first (like with pretty much anything new we as humans first learn)
I'll be using e-juice me up as an example, but they all work pretty much in the same way. There are quite a few of them out there and even cellphone apps that do exactly the same thing. I suggest you pick one that you like the look of, but e-juice me up certainly seems to be the most popular one.
You can get e-juice me up here.(Windows)
I recommend you read my previous post first (linked above), as I explain all of the concepts of mixing in there as well as the safety aspects.
I think the best way to deal with this is to just work my way through a sample e-liquid recipe mix using the calculator.
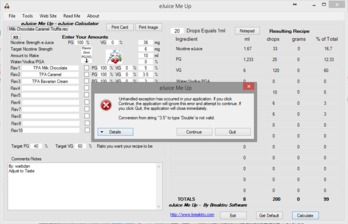
After installing e-juice me up, start it up and you should be presented with this screen
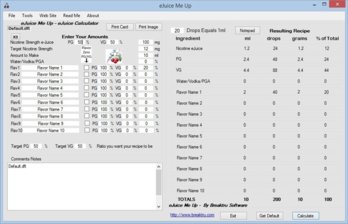
Yep, I know - OMG look at all those things I have to fill in, I'm never going to be able to DIY, let me just click that red x again and go vape a bit till I feel better
Don't worry, it is not as complicated as it looks. It is actually pretty straight forward.
The left half of the screen is information it wants from you (and you know this), the right hand side is where it will give you the results - i.e. the recipe for your mix.
Now the software has a lot of extra functions to help you do a variety of other things related to DIY, but for the purpose of this post, I'm just going to talk about mixing a new recipe.
To mix a recipe, you need to provide 4 things:
1. Base: Your base liquid PG/VG ratio & nic strength
2. Target: Your target(your resulting mix) liquid PG/VG Ratio and nic strength
3. Amount: How much you want to make of your mix
4. Flavours: Which flavours and how much of it you want to use
So for this example, I'm going provide the following to the above 4 inputs required
1. Base: 50PG/50VG at 36mg
2. Target: 50PG/50VG at 6mg
3. Amount: 10ml
4. Flavours: Pina Coolada and Coconut at 5% each
I realize that the order that the software is asking for these values feels a bit arse-about-face to some, but once you have done it a few times, it does become second nature
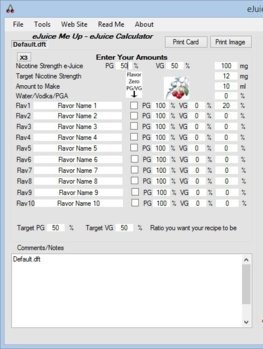
So let's have a closer look at the left hand side of the screen and see if you can identify where those 4 things need to be entered.
INPUT:
1. Base
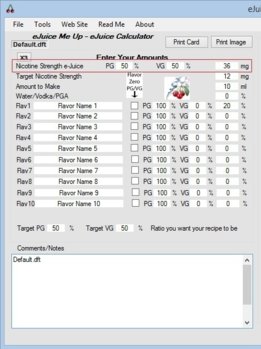
On the screen above, is the input marked "Nicotine strength Ejuice" - next to it is PG/VG percentages and mg
For this example we are going to use a 36mg, 50PG/50VG mix I made earlier using the method described in the DIY Your first time post.
So now that I have filled in the details regarding my base nic liquid the screen looks like this (I filled in the highlighted part.)
2. Target
To fill in the Target PG/VG ratio we unfortunately have to jump around on the screen a bit as it is done at 2 separate places. Firstly we fill in the input marked as "Target Nicotine Strength" and I've chosen 6mg
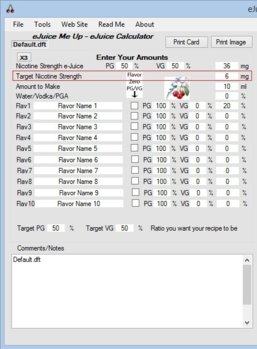
Then we will in the PG/VG ratio, right at the bottom of the page. I find that if I don't do it in this order that I forget about the ratio and end up with weird results
Below is the position of the input where you can fill your ratio in:
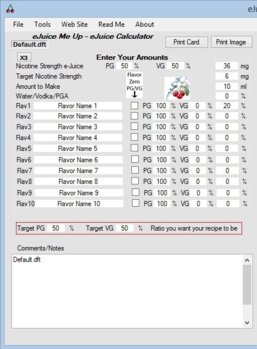
Perhaps just a quick note on Ratios - I tend to assume people know what a ratio is in this context, but just in case - the two percentage added together should always equal 100%. If you change one of the ratios, it will adjust the other: So if you change your VG to 60% it will adjust PG down to 40%.
3. Amount
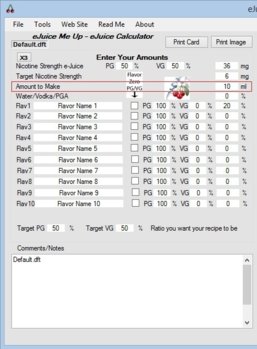
The easiest input Just fill in how much e-liquid(in ml) you want to make with this recipe. I suggest starting out with 10ml, nice round number and gives you enough to test right away, plus enough to put away for steeping that you can try later to compare against the freshly mixed stuff.
Once you become world renowned for your flavour creations, you can make 100 liters of your mix, using exactly the same recipe and just changing the amount
4. Flavours
The final input
This is where your creativity and innovation comes into play. How much to use of each flavour and which flavour combinations work together is very much a hit and miss scenario. With time and experience you will start to figure out which kind of flavour will work together and which don't. The only way to learn is to experiment, there are no hard and fast rules - and just when you think there are, someone hands you a mix with flavours you never thought could possible work together. For me this is where the fun part of DIY mixing comes in. Very rarely will you mix an absolutely unvapable mix, so worst case scenario you have an 'ok' flavour to vape for a while and still cheaper than buying ready to vape e-liquids
A quick word about Flavours: Most flavours are made with PG as a base, this has a variety of reasons, one of which is that a single flavour might take many ingredients to make, and all these ingredients might not want to mix with each other. PG is a very good 'solvent' i.e. it makes things mix that usually don't want to mix.
There are of course flavours that do not use PG, either because VG can act well enough as a solvent for the ingredients used, or there is just one ingredient and thus no solvent needed.
To find out what your flavour's solvent or base is, ask your supplier, or look at the manufacturer's website.
This is where the flavour's PG/VG ratio comes in under the list of flavours you can enter. The flavours I'm working with for this example is PG based, so I leave the default there of 100% PG.
I type in the name of each flavour, leave the 100% PG as is, and type in my percentage of 5% for each flavour - here is my screen below:
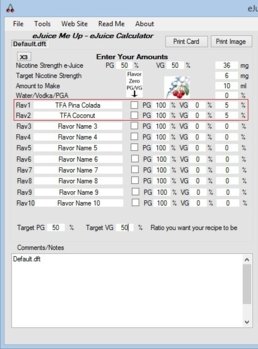
I always put in the Manufacturer of each flavour in the description, as many of the flavour suppliers can have flavours with the same name and you don't want to use the wrong one next time that you mix.
And that is it!, you have just taken your first step at becoming a DIY adventurer!
Now you can save this recipe, just click on File -> Save and give it an appropriate name, e-juice me up also has a 'Notes' area that you can type in to save with your file. This is handy once you start refining your mix. Also use this area to make notes as you are testing your mix, so you know what to adjust for the next iteration of your recipe.
I'm going to end this here as this post is getting a bit long and is very picture heavy - will post in a day or two about the right hand side of the screen and how to interpret what is said there - I will also include some errors you might encounter and what they mean
Happy mixing
Derick
So I thought it was about time to help explain the e-liquid calculators for those of you that want to be pretty much 100% accurate with your mixes because your OCD is just killing you
They are actually pretty easy as well, it is just a bit confusing at first (like with pretty much anything new we as humans first learn)
I'll be using e-juice me up as an example, but they all work pretty much in the same way. There are quite a few of them out there and even cellphone apps that do exactly the same thing. I suggest you pick one that you like the look of, but e-juice me up certainly seems to be the most popular one.
You can get e-juice me up here.(Windows)
I recommend you read my previous post first (linked above), as I explain all of the concepts of mixing in there as well as the safety aspects.
I think the best way to deal with this is to just work my way through a sample e-liquid recipe mix using the calculator.
After installing e-juice me up, start it up and you should be presented with this screen

Yep, I know - OMG look at all those things I have to fill in, I'm never going to be able to DIY, let me just click that red x again and go vape a bit till I feel better
Don't worry, it is not as complicated as it looks. It is actually pretty straight forward.
The left half of the screen is information it wants from you (and you know this), the right hand side is where it will give you the results - i.e. the recipe for your mix.
Now the software has a lot of extra functions to help you do a variety of other things related to DIY, but for the purpose of this post, I'm just going to talk about mixing a new recipe.
To mix a recipe, you need to provide 4 things:
1. Base: Your base liquid PG/VG ratio & nic strength
2. Target: Your target(your resulting mix) liquid PG/VG Ratio and nic strength
3. Amount: How much you want to make of your mix
4. Flavours: Which flavours and how much of it you want to use
So for this example, I'm going provide the following to the above 4 inputs required
1. Base: 50PG/50VG at 36mg
2. Target: 50PG/50VG at 6mg
3. Amount: 10ml
4. Flavours: Pina Coolada and Coconut at 5% each
I realize that the order that the software is asking for these values feels a bit arse-about-face to some, but once you have done it a few times, it does become second nature
So let's have a closer look at the left hand side of the screen and see if you can identify where those 4 things need to be entered.
INPUT:

1. Base
On the screen above, is the input marked "Nicotine strength Ejuice" - next to it is PG/VG percentages and mg
For this example we are going to use a 36mg, 50PG/50VG mix I made earlier using the method described in the DIY Your first time post.
So now that I have filled in the details regarding my base nic liquid the screen looks like this (I filled in the highlighted part.)

2. Target
To fill in the Target PG/VG ratio we unfortunately have to jump around on the screen a bit as it is done at 2 separate places. Firstly we fill in the input marked as "Target Nicotine Strength" and I've chosen 6mg

Then we will in the PG/VG ratio, right at the bottom of the page. I find that if I don't do it in this order that I forget about the ratio and end up with weird results
Below is the position of the input where you can fill your ratio in:

Perhaps just a quick note on Ratios - I tend to assume people know what a ratio is in this context, but just in case - the two percentage added together should always equal 100%. If you change one of the ratios, it will adjust the other: So if you change your VG to 60% it will adjust PG down to 40%.
3. Amount
The easiest input
Once you become world renowned for your flavour creations, you can make 100 liters of your mix, using exactly the same recipe and just changing the amount

4. Flavours
The final input
This is where your creativity and innovation comes into play. How much to use of each flavour and which flavour combinations work together is very much a hit and miss scenario. With time and experience you will start to figure out which kind of flavour will work together and which don't. The only way to learn is to experiment, there are no hard and fast rules - and just when you think there are, someone hands you a mix with flavours you never thought could possible work together. For me this is where the fun part of DIY mixing comes in. Very rarely will you mix an absolutely unvapable mix, so worst case scenario you have an 'ok' flavour to vape for a while and still cheaper than buying ready to vape e-liquids
A quick word about Flavours: Most flavours are made with PG as a base, this has a variety of reasons, one of which is that a single flavour might take many ingredients to make, and all these ingredients might not want to mix with each other. PG is a very good 'solvent' i.e. it makes things mix that usually don't want to mix.
There are of course flavours that do not use PG, either because VG can act well enough as a solvent for the ingredients used, or there is just one ingredient and thus no solvent needed.
To find out what your flavour's solvent or base is, ask your supplier, or look at the manufacturer's website.
This is where the flavour's PG/VG ratio comes in under the list of flavours you can enter. The flavours I'm working with for this example is PG based, so I leave the default there of 100% PG.
I type in the name of each flavour, leave the 100% PG as is, and type in my percentage of 5% for each flavour - here is my screen below:

I always put in the Manufacturer of each flavour in the description, as many of the flavour suppliers can have flavours with the same name and you don't want to use the wrong one next time that you mix.
And that is it!, you have just taken your first step at becoming a DIY adventurer!
Now you can save this recipe, just click on File -> Save and give it an appropriate name, e-juice me up also has a 'Notes' area that you can type in to save with your file. This is handy once you start refining your mix. Also use this area to make notes as you are testing your mix, so you know what to adjust for the next iteration of your recipe.
I'm going to end this here as this post is getting a bit long and is very picture heavy - will post in a day or two about the right hand side of the screen and how to interpret what is said there - I will also include some errors you might encounter and what they mean
Happy mixing
Derick
Last edited:


