Finally built my Subtank Mini RBA a coil!

Wash

Experienced Vaper
LV
29
 
Joined
23/9/15
Posts
102
Awards
18
Age
40
Location
PTA
I finally jumped in and built a coil!

I was only planning on re-wicking the standard 0.5 ohm coil that came with the RBA, but after I got the thing open and saw the wire and snips I bought a week ago glaring accusingly at me, I thought I might as well give it a bash!

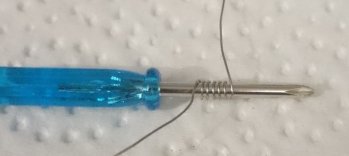
28ga Kanthal
6 spaced Wraps to try and get to 0.8ohm. Inexperience and shoddy workmanship turned it into a 1.0 ohm coil.

The wrapped Coil
Coil Wound.JPG

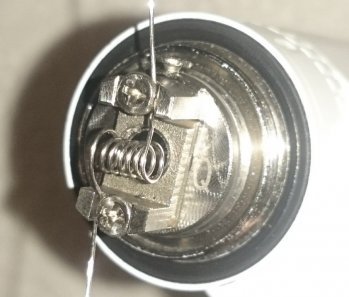
Mounting the coil. More of an hourglass than a cylinder. The spaced wraps meant that I had to try and kink the legs inwards to reach the posts.
Coil Mount.JPG

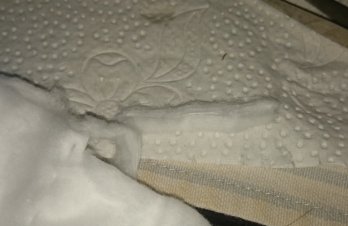
I cut myself a wick from some Dove pleated cotton wool - so far, when compared to the cotton I got with the Subtank mini, the only comment I can make is that the Dove cotton pulls apart far easier. Had to be very careful threading the cotton through the coil.
Wick Cut.JPG

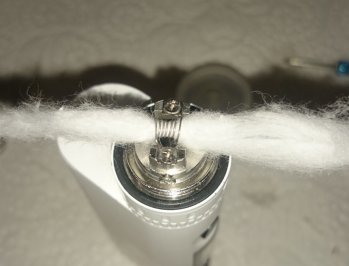
After Threading the cotton through the coil. Had to re-centre it a few times due to cotton just letting go of its neighbours...
Wick Thread.JPG

Finally got the barrel on and trimmed the wick before shoving the cotton down to cover the holes on the barrel. I tried to pull the cotton through the holes and trim close to the barrel, but the very loose cotton made me rethink this strategy.
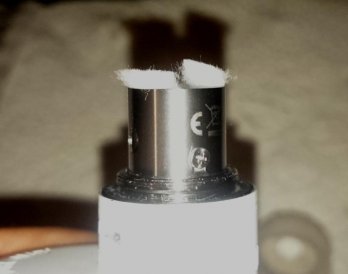
Wick Trim.JPG

I didn't take any pics after this because, frankly, one wicked, juiced subtank looks pretty much like any other to me.

Any tips, tricks, advice and/or scathing criticism are welcome!
 
Sweet build @Wash . When you test fired the coil was it heating up evenly. I see your wraps are quite spaced out & I could never achieve an even heat distribution unless mine were squeezed tight
 
Hi there @Wash , welcome to the build :) ! It only gets easier from here on out.

That is not too shabby for a first attempt, something i do and would suggest doing is burning the coils for a bit (pulse the coils) prior to adding the cotton wick. It generally gives off a bit of smoke and then the wick is primed and you wont inhale the rather burny coil smoke.

From the pic it also looks like your wick is pointing upwards in the tank you would generally try and get them to face into the well at the bottom of the tank so you absorb the juice and avoid dry hits.

I am sure that there will be a lot more valuable advise from the gurus on the forum ! Good luck with the future builds !
 
Have a look at this vid , it might help a bit ...

 
Sweet build @Wash . When you test fired the coil was it heating up evenly. I see your wraps are quite spaced out & I could never achieve an even heat distribution unless mine were squeezed tight
something i do and would suggest doing is burning the coils for a bit (pulse the coils) prior to adding the cotton wick. It generally gives off a bit of smoke and then the wick is primed and you wont inhale the rather burny coil smoke.

I did a dry burn prior to inserting the wick to specifically test this. heated up (turned red, then yellow) nicely from the centre of the coil outwards. The goal behind using spaced coils was to try and avoid the burnt feeling (not taste so much - felt like smoke hitting the back of my throat) I was starting to get with the Kanger coil.

From the pic it also looks like your wick is pointing upwards in the tank you would generally try and get them to face into the well at the bottom of the tank so you absorb the juice and avoid dry hits.

I had the cotton pointing upwards just to gauge where to trim it. After that pic was taken, I pushed the tails down into the barrel to cover the holes. Right now, from the ends of the coil, the cotton bends down, and then turns back up again. Thanks for the link, @CloudmanJHB. I'll give it a watch when I'm not being Vid-blocked by my employer's draconian monitoring software. ;)
 
[QUOTE I'll give it a watch when I'm not being Vid-blocked by my employer's draconian monitoring software. ;)[/QUOTE]

Be grateful that you at least have access to this site lol. I have days where our company firewall blocks off Ecigssa completely . Those are probably my most productive days at work:D
 
If you want to wrap spaced coils use 2 wires parallel and wrap on screwdriver or whatever you are using, once you have wrapped it remove the one and then you will have 2 nicely wrapped spaced coils :)
 
If you want to wrap spaced coils use 2 wires parallel and wrap on screwdriver or whatever you are using, once you have wrapped it remove the one and then you will have 2 nicely wrapped spaced coils :)

I'll try that the next time. Also, I'll drop to 5 wraps instead of 6 - that should get me closer to 0.8 ohm and also make mounting the coil on the posts easier...
 
If you want to wrap spaced coils use 2 wires parallel and wrap on screwdriver or whatever you are using, once you have wrapped it remove the one and then you will have 2 nicely wrapped spaced coils :)
Nice . Never thought of doing that .

Bet it would also save time on dual coil builds as you don't have to wrap separately
 
I did a dry burn prior to inserting the wick to specifically test this. heated up (turned red, then yellow) nicely from the centre of the coil outwards. The goal behind using spaced coils was to try and avoid the burnt feeling (not taste so much - felt like smoke hitting the back of my throat) I was starting to get with the Kanger coil.


I had the cotton pointing upwards just to gauge where to trim it. After that pic was taken, I pushed the tails down into the barrel to cover the holes. Right now, from the ends of the coil, the cotton bends down, and then turns back up again. Thanks for the link, @CloudmanJHB. I'll give it a watch when I'm not being Vid-blocked by my employer's draconian monitoring software. ;)

O right ok cool, thought the wick was staying up :D
 
Thats an awesome coil for your first time @Wash

(you dont want to know what my first coil looked like)

As was mentioned earlier, the road of coil building gets easier from now.

Personally i never fancied spaced coils.

Looking at your pics, it seems that the coil has a larger ID at the end and smaller in the middle? Or is it just the angle of the pic?

The trick here is to leave the screwdriver in the coil when fastening the coil legs, this keeps the coil uniform throughout.

The big question is, how is the vape on your newly built coil?
 
@Wash, for a first go, that look really good man! Is it vaping lekker? Personally, I prefer a compressed coil, maybe try it out next time and see which suits you better?
 
Looking at your pics, it seems that the coil has a larger ID at the end and smaller in the middle? Or is it just the angle of the pic?

The outer diameters of the coil opened up while I was trying to fit the coil onto the posts - the coil was a little longer than the posts allowed for. I kept the screwdriver in the coil to try and avoid this, but in the end, I built an hourglass instead of a cylinder.

I wanted to try the spaced coil, as I was getting a burnt sensation from the kanger compressed coil. So far, no burnt sensation, but otherwise I can't tell if it's any better or worse. Maybe I still have to pick up on the nuances of flavour. I have not kicked the stinkies completely yet and this might be what is stopping me from picking up any changes...
 
I finally jumped in and built a coil!

I was only planning on re-wicking the standard 0.5 ohm coil that came with the RBA, but after I got the thing open and saw the wire and snips I bought a week ago glaring accusingly at me, I thought I might as well give it a bash!

28ga Kanthal
6 spaced Wraps to try and get to 0.8ohm. Inexperience and shoddy workmanship turned it into a 1.0 ohm coil.

The wrapped Coil
View attachment 43686

Mounting the coil. More of an hourglass than a cylinder. The spaced wraps meant that I had to try and kink the legs inwards to reach the posts.
View attachment 43687

I cut myself a wick from some Dove pleated cotton wool - so far, when compared to the cotton I got with the Subtank mini, the only comment I can make is that the Dove cotton pulls apart far easier. Had to be very careful threading the cotton through the coil.
View attachment 43688

After Threading the cotton through the coil. Had to re-centre it a few times due to cotton just letting go of its neighbours...
View attachment 43689

Finally got the barrel on and trimmed the wick before shoving the cotton down to cover the holes on the barrel. I tried to pull the cotton through the holes and trim close to the barrel, but the very loose cotton made me rethink this strategy.
View attachment 43690

I didn't take any pics after this because, frankly, one wicked, juiced subtank looks pretty much like any other to me.

Any tips, tricks, advice and/or scathing criticism are welcome!
When you have the coil on the screwdriver and your pliers in the other hand, you can make the legs tourn outwards etc. to corretly space the legs for that awkward subtank angle youneed it mountaed it. You can even bend it with your hands, doesn't have to be with pliers.

Let us know when you wandecide to try verticals inside there :p
 
The big question is, how is the vape on your newly built coil?

@Wash, for a first go, that look really good man! Is it vaping lekker?

Great first build! how does it vape? you happy?

As for how it vapes:

Button goes in, vapor comes out. It doesn't burn or make me gag. That's about as much as I can ask for!

Like I said above, I don't have enough experience / finesse to distinguish any kind of difference between the OCC coils, the pre-made RBA coils and my DIY coil. Apart from slightly different draws, which I assume is due to the different amounts/configuration of wicking, I can't point out anything that's better/worse/different.
 
Nice . Never thought of doing that .

Bet it would also save time on dual coil builds as you don't have to wrap separately

Yep, If I am in a hurry and need to wrap duel this is the method I use :D But also works nice for single because then you have a spare one for next time
 
Back
Top