Navigation
Install the app
How to install the app on iOS
Follow along with the video below to see how to install our site as a web app on your home screen.

Note: this_feature_currently_requires_accessing_site_using_safari
More options
You are using an out of date browser. It may not display this or other websites correctly.
You should upgrade or use an alternative browser.
You should upgrade or use an alternative browser.
KUI a closer look
- Thread starter kimbo
- Start date
I've broken mine already trying to get the atty to sit flush. I was trying to get the atty to sit flush and I mangled the plastic spacer that sits around the firing pin. I then tried to use the spare one and it split as I was putting the pin back in.
Thanks dude, I appreciate the thought. I'll make a plan this weekend, just needs a bit of fiddling.@Gambit if i was closer i would give you mine
Yes, i am rather waiting for @jtgrey to come here again then i will ask him to do mineThanks dude, I appreciate the thought. I'll make a plan this weekend, just needs a bit of fiddling.
My hands dont like small things
That will be really niceYeah, maybe we can convince @jtgrey to do a nice step by step vid for us or something.
So, who's got a 510 kit?  Managed to totally screw up the grommet that was in there, silicone ones have too much movement which will definitely result in a short
Lol, I just posted a similar post in the KUI Monster threadI've broken mine already trying to get the atty to sit flush. I was trying to get the atty to sit flush and I mangled the plastic spacer that sits around the firing pin. I then tried to use the spare one and it split as I was putting the pin back in.
@LandyMan when the holiday is over i will make sure i get some with the bottlesSo, who's got a 510 kit?Managed to totally screw up the grommet that was in there, silicone ones have too much movement which will definitely result in a short

@Andre i asked @Alex if we can have a KUI section were all the fixes and so can go, i am still waiting for him. I am for it if this is moved. i just posted here because i have a personal interest in the KUI so did not want the review to go into the open forum
You did such an objective job of it, I am sure no one shall have a problem.
I have small hands lolwow, how did you manage to fit 24g in that space LOL
I struggled with 28g
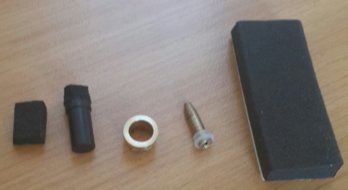
This is what I made up so far . Reo button (took the locking pin out) , kui 510 pin that has been made smaller on the top side , 510 grommet from a old cartomizer (they are a perfect fit for the 510 ) ,used the old button locking ring to make a sleef for the new button and some 1 way rubber strips to use to prevent the positive blade to short out anywhere inside the kui .
Going to put this in @Andre kui and see how good it works .
Going to put this in @Andre kui and see how good it works .

This is what I made up so far . Reo button (took the locking pin out) , kui 510 pin that has been made smaller on the top side , 510 grommet from a old cartomizer (they are a perfect fit for the 510 ) ,used the old button locking ring to make a sleef for the new button and some 1 way rubber strips to use to prevent the positive blade to short out anywhere inside the kui .
Going to put this in @Andre kui and see how good it works . View attachment 22045
I can make a complete new button but because the reo button is easy to get and if you ever need to replace it it will be easier then making a new button . The plus side is that you would be able to use reo button caps and the down side will be that the button will not lock any more . For me it was ok because I never lock my reo's any way .This is what I made up so far . Reo button (took the locking pin out) , kui 510 pin that has been made smaller on the top side , 510 grommet from a old cartomizer (they are a perfect fit for the 510 ) ,used the old button locking ring to make a sleef for the new button and some 1 way rubber strips to use to prevent the positive blade to short out anywhere inside the kui .
Going to put this in @Andre kui and see how good it works . View attachment 22045
@jtgrey could you please help and advise how to remove the 510 pin. From your pic it does not look like its threaded. Once I have taken the bottom off the pin and removed the plate must i just push it up and out?This is what I made up so far . Reo button (took the locking pin out) , kui 510 pin that has been made smaller on the top side , 510 grommet from a old cartomizer (they are a perfect fit for the 510 ) ,used the old button locking ring to make a sleef for the new button and some 1 way rubber strips to use to prevent the positive blade to short out anywhere inside the kui .
Going to put this in @Andre kui and see how good it works . View attachment 22045
Great thank you, just didn't want it to be an oops moment.Yes @BigAnt but before you push it out first screw back the small piece on the 510 pin to prevent the thread getting bust while you push the pin out
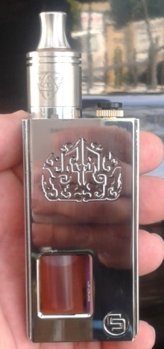
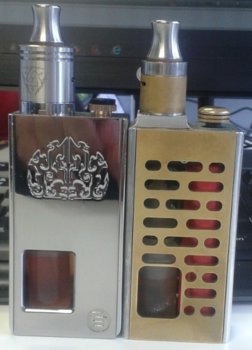
Here's some daytime shots after 2 days ADV use/test...flawless and no surprises. I got quite quickly used to the locking ring, so no major hassle there. When I bought this mod, I didn't buy it for it was, I bought it for what it could be...a project-base for a zero-overhang Odin-wielding BF box and it's almost there already. Next would be to pretty-fy the firing button, do something about the sharpish top-front corners and look for a stiffer connector leaf as the standard one is just a bit too soft to my liking. Also think think firing connection could be better.I've got one of the silver ones, so can't take proper pics coz it's too shiny with the flash at night. I'll try again in daylight. Look and vape is ossim
View attachment 22023


Last edited:
Okay,
Here we go,
I have used this KUI for about 2.5 days now..
Here are my thoughts...
I think it is an amazing little Reo Clone, the firing button works fine on my side right of the bat.. It hits hard, takes dual coils on the stock atomizer easily. It build quality is about 7.5/10 it really is not bad at all.
I did have some issues on the first go however. When I first loaded it up the spring shorted instantly no idea why, however once putting in a new spring it has worked flawlessly.. So a minor really.
It does give an identical vape to Reo, however it has a few irritations.. Well 4 main ones. But really not a deal breaker for me..
The usage of the KUI has been good enough that I am considering a SL LP Reo Grand again only because its nice and light to be honest.
Anyway onto the niggilies:
Firstly, the atty not sitting flush from the start is not acceptable, but its not a biggie as I can see some of you diy experts have been able to fix that..
Secondly the choice to use Zinc Alloy instead of aluminium makes no sense to me and the added extra weight is really quite a flaw.
Thirdly the bottle is terrible unless it basically 60% full. Below that it struggles to feed correctly. But I am sure we can get replacement bottles.
Fourthly the dripper it comes with is not bad, but not great.. However for the price in at it does the job perfectly.
Similar threads
- Replies
- 0
- Views
- 87
- Replies
- 0
- Views
- 72
- Replies
- 1
- Views
- 103
- Replies
- 13
- Views
- 335


