My First RDA build

StaticX

New Vaper
LV
5
 
Joined
26/11/17
Posts
79
Awards
9
Age
34
Location
Cape Town
Hi All

Okay so i bought my first RTA (Ammit 25) and after almost selling it after a day seeing as i could just not build or wick it i got some help on here and from a awesome shop in Cape Town.

My second step was a RDA and not wanting to spend more money and then maybe not being happy, i went out and traded my Smok tank for a Peerless Specials addition RDA and a Icon RDA

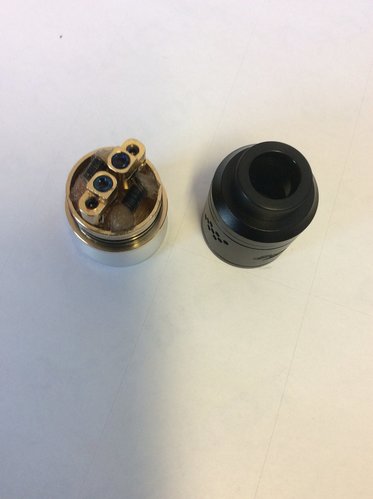
Thr Peerless was already wicked when i received it today so i have not touched it myself, but i tried my luck with the Icon

After wasting two coils i found that the icon needs the coil to have a top right and a bottom left. Luckily i had coils in my Skynet kit that was build this way


I placed the coils in the deck and then wicked it. . . . Not great but its working. Currently im not getting a lot of flavour but ill try again

Attach are some images.

Any comments or advices would be appreciated


5f9d439efa64da1814bba251392ff3b6.jpg
224ffb735a3451db24de04582a99a4eb.jpg
78f1d3d9867d781377560ac2ac684a91.jpg
6aecf547ab541f69d79b2b34cf18d46b.jpg


Sent from my SM-G935F using Tapatalk
 
You're off to a great start mate. You could lift your coils a little and make sure the area under the coils are clear of cotton so the airflow can get under the coils. Should improve the flavor. Good luck! :)
 
You're off to a great start mate. You could lift your coils a little and make sure the area under the coils are clear of cotton so the airflow can get under the coils. Should improve the flavor. Good luck! :)
Thank you ill definitely give that a go

Sent from my SM-G935F using Tapatalk
 
Grab some nichrome and a 2.5mm and 3mm screwdriver and make your own coils. Reason being is it is cheaper if you ness up.
 
Hi All

Okay so i bought my first RTA (Ammit 25) and after almost selling it after a day seeing as i could just not build or wick it i got some help on here and from a awesome shop in Cape Town.

My second step was a RDA and not wanting to spend more money and then maybe not being happy, i went out and traded my Smok tank for a Peerless Specials addition RDA and a Icon RDA

Thr Peerless was already wicked when i received it today so i have not touched it myself, but i tried my luck with the Icon

After wasting two coils i found that the icon needs the coil to have a top right and a bottom left. Luckily i had coils in my Skynet kit that was build this way


I placed the coils in the deck and then wicked it. . . . Not great but its working. Currently im not getting a lot of flavour but ill try again

Attach are some images.

Any comments or advices would be appreciated


5f9d439efa64da1814bba251392ff3b6.jpg
224ffb735a3451db24de04582a99a4eb.jpg
78f1d3d9867d781377560ac2ac684a91.jpg
6aecf547ab541f69d79b2b34cf18d46b.jpg


Sent from my SM-G935F using Tapatalk

@StaticX "I'll keep trying" nice one, you're doing great
 
Hi All

Okay so i bought my first RTA (Ammit 25) and after almost selling it after a day seeing as i could just not build or wick it i got some help on here and from a awesome shop in Cape Town.

My second step was a RDA and not wanting to spend more money and then maybe not being happy, i went out and traded my Smok tank for a Peerless Specials addition RDA and a Icon RDA

Thr Peerless was already wicked when i received it today so i have not touched it myself, but i tried my luck with the Icon

After wasting two coils i found that the icon needs the coil to have a top right and a bottom left. Luckily i had coils in my Skynet kit that was build this way


I placed the coils in the deck and then wicked it. . . . Not great but its working. Currently im not getting a lot of flavour but ill try again

Attach are some images.

Any comments or advices would be appreciated


5f9d439efa64da1814bba251392ff3b6.jpg
224ffb735a3451db24de04582a99a4eb.jpg
78f1d3d9867d781377560ac2ac684a91.jpg
6aecf547ab541f69d79b2b34cf18d46b.jpg


Sent from my SM-G935F using Tapatalk
@StaticX , looks great! I think I a agree with @zadiac , less cotton underneath to get that air flowing, end result will be great!! Thank heavens you kept going and didn't sell like you initially wanted too, lookee at where you are going. :cool:

Enjoy the practice and the flavour explosion on its way to you. And play with the different coils, I run a 3mm Id parallel wrap in Ni80, 24 g, coming in at 0.09ohms, good flavour and good clouds.
IMG_0052.JPG

Final rule applies, enjoy the experience!!:D
 
Btw ....... in Melkbostrand for the whole day if that is closer for you. Just pm me for my number if you still need assistance.
@KZOR im also based in Bellville not far from Tyger Valley Mall. If i dont get it sorted ill def send you a pm even if its only after the festive season

Sent from my SM-G935F using Tapatalk
 
@Room Fogger

Ill def add less cotton in the next one.

I do seem more money going into this for some tools

Sent from my SM-G935F using Tapatalk
 
@Room Fogger

Ill def add less cotton in the next one.

I do seem more money going into this for some tools

Sent from my SM-G935F using Tapatalk
There is always something more, but you don't have to go overboard. But having them when you need them is key. Good side cutters, scissors, tweezers and screwdrivers and ready to go. Those little sets that are available from the vape shops are good, I just added better screwdrivers because I battle holding them thin things.:D
 
I love my RDA units so much flavour. . . Got some Nostalgic Totz on the coils today

c335b00f88b0028bb82897b95bd0f6bb.jpg


Sent from my SM-G935F using Tapatalk
 
Last edited:
Im love my RDA units so much flavour. . . Got some Nostalgic Totz on the coils today

c335b00f88b0028bb82897b95bd0f6bb.jpg


Sent from my SM-G935F using Tapatalk
@StaticX - glad the video got you going, post some pics in this thread of your build. Would like to see your skillzz cuz. ;) sorry for the late reply, im on holiday now, so not on this forum all the time. (Beautiful husky in the back of that pic)

@Slick - thanks for the repost and mention. Shweeet cuz!
 
I got myself a small tool kit yesterday and some standard kanthal a1 wire. Will be testing some coil

My current build in the icon is two super tiger coils from the skynet kit and some cotton bacon

Sitting at 0.14ohm
b8591a3ceb409292253575e488f49e57.jpg
073cc1a4f37a1c4d609133749974b737.jpg


Sent from my SM-G935F using Tapatalk
 
hey bud. glad you kept the ammit its an awesome atty. if you vuilding on the icon and only have small coil like the one in the pic above, you can you use just the inner post. you dont need need to stretch out to the outwr post. it will just mean getting 2 legs from the either side into the same inner post and leaves you more room to drop your wicks. with the kantal wire you bought assuming its 26g you will comfortably get 7 wraps to fit.

craig from sir vape posted a video on the bowtie wicking method. check it out. and then if you really want to go the next step scottish roll method. for dripping this works really well.
 
I am in Belllville area so when you find yourself in my vacinity you are welcome to make a turn and we can work together to sort you out. ☺
Goeie ding ek bly nie naby jou nie. Sal permanent daar by jou wees vir advies
 
En jy sou baie welkom wees. Daar is net vier etters wat ek nooit sal inlaat nie maar al die res kan met graagte 'n draai kom maak. :)
HAHAHAHA "etters" HAHAHAHA
As ek ooit eendag in die kaap is, sal ek jou vir n bier stick
 
@Hakhan thank you very much for the advice. Ill def have a look at the videos

The wire i received was 24g and the first test coils i made was as per the video above ended with 7 wraps.

If i can use the center posts for both coil leads it would be so much less work

Sent from my SM-G935F using Tapatalk
7wraps on 24 gauge will work as well. place coil cut leads, remove and do the same for the other coil and then place both together and tighten down.
 
Back
Top