My metal casting journey, thus far.

blujeenz

Loafing since 2013
LV
42
 
Joined
18/10/15
Posts
2,682
Awards
33
Age
62
Location
Cape Town, South Africa
Basically it starts with a furnace, mine I built some years ago as my son wanted one.
Buying a bag of refractory cement and using buckets as the form is the cheapest way to go. Some youtubers use those white insulation bricks that can be cut with a wood saw, but at R900 for 10 its gonna be an expensive build.

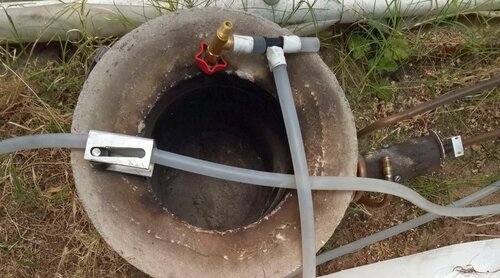
Im using a diaphragm pump and gravity drip car oil, so the brass valve with the red handle is a way of regulating the air and the large flow control hospital drip thingy is for controlling the oil drips. Its just bent aluminium with a nylon wheel on a SS shaft.
furnace top.jpg

My main mission was finding a source for the molding sand(greensand), no success so I made my own.
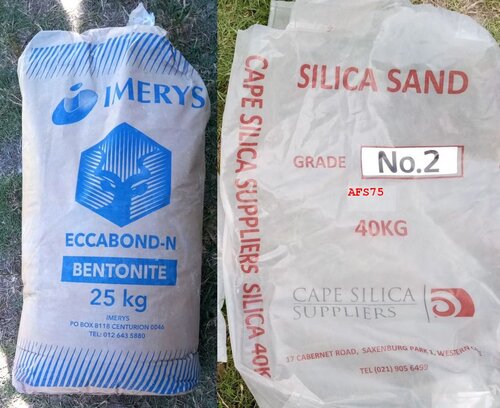
AFS75 grade2 is the finest sand from Cape silica in Blackheath. (R204 for 40kg)
Eccabond N is bentonite powder from Serina Trading out Noordhoek way but collected in Bellville south. (R285 for 25kg)
clay sand.jpg

The sand must be mixed with 7 to 10% clay or 7:1 by volume. I used a big paint stirrer (120mmx600mm) but my drill got rather hot, not knowing which one would be best, I bought all 3 types Brights hardware had, turned out the small 80x400 one worked best. (R104)
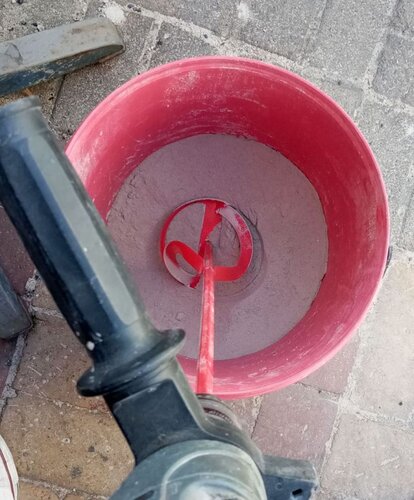
dry mix.jpg

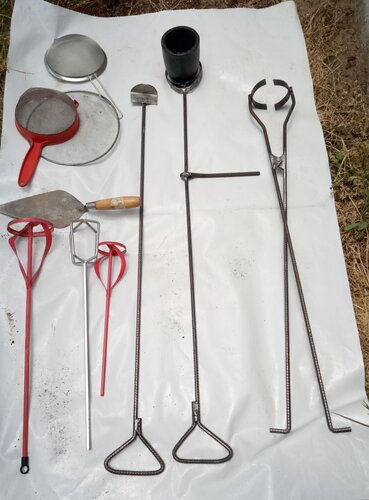
Some of the large tools I have sourced and made. The length of 6m rebar was R85 and I've used 4m so far for the 3 crucible tools on the right.
Salamander A4 crucible from https://www.gjsupplies.co.za/crucibles.html (R405)
Sieves are, 0.5mm at the top, its the large one from Makro, Chef's Kitchen 2-Pack Strainer (R129)
The red handle is a 1.6mm and the flat disk is a 1mm from Chinatown.
The paint stirrers from Brights, big is R145, small on on the right is R104 and the thingy in the middle is a H/Duty grout mixer at R79.95.
large tools.jpg

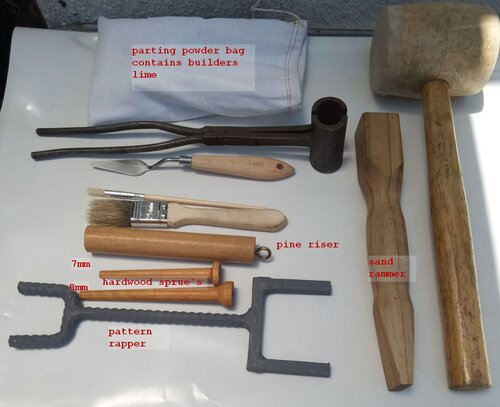
The small items are, parting powder bag I sewed myself, builders lime from Penny pinchers (R86 for 25kg)
Rubber mallet I've had for 10 years, was going to do wooden flooring but changed my mind.
Dunno what the tongs were for but they were in my dad's tools.
The small trowel (R39.50 ) and brushes were from PNA.
The wood sprue's, riser and sand rammer were made on the lathe, the tuning fork thingy I also welded up from some rebar.
small tools.jpg

The most difficult part so far has been getting the water amount in the greensand just right.
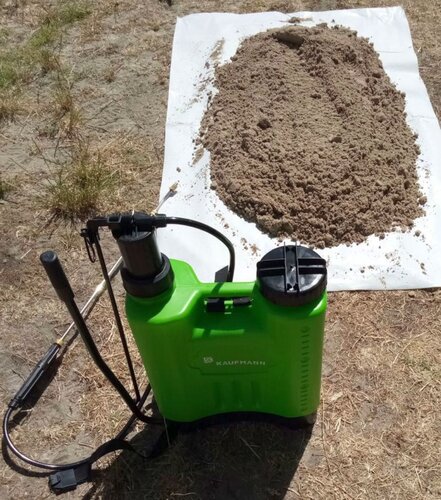
I use a knapsack sprayer from Brights (on special at R299 till 20 Dec 2020), its easy to use , works well and IMO is the last word in hand sprayers.
I had my sand too wet so its been drying in the sun for the last 2 days, rake and check, turn and dry.
greensand sprayer.jpg

A lot of Ytubers suggest the hand squeeze test, but its not always an accurate test.
One of the tubers I sub has been in the foundry business for the last 50 years and is my first stop for foundry related research, Olfoundryman at https://www.youtube.com/channel/UC90RoN_IjSRF18jAG0HIA6g.
His method involves rubbing the sand through a sieve and seeing how it falls.
My sand had a clean break but was still too wet to go through the sieve with the 1mm openings.
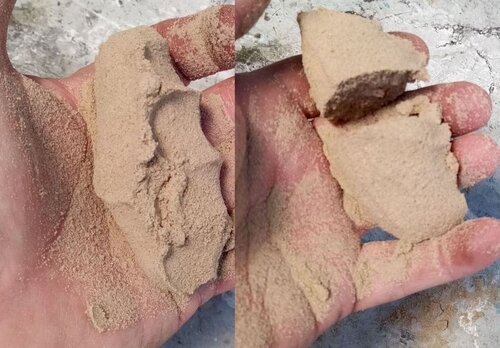
sand hand test.jpg

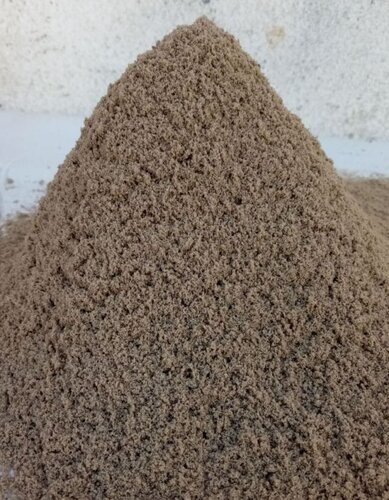
Some views of sieved sand, top pile is from the middle of my 40kg barrel, surface level is the bottom pile.
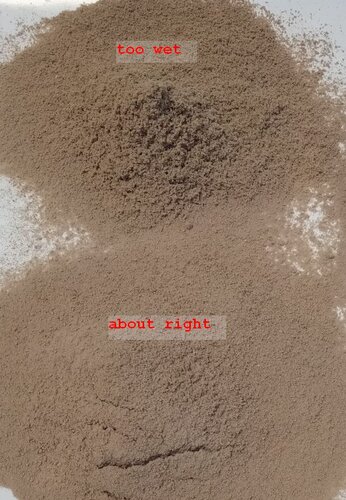
wet dry sand.jpg


When the sand is too wet, it sticks where it falls giving the appearance of holes in a spiky pile.
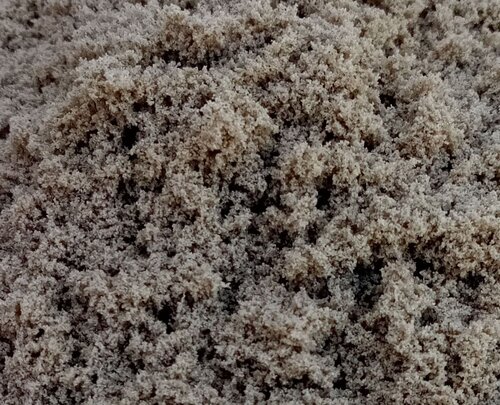
wet holes1.jpg

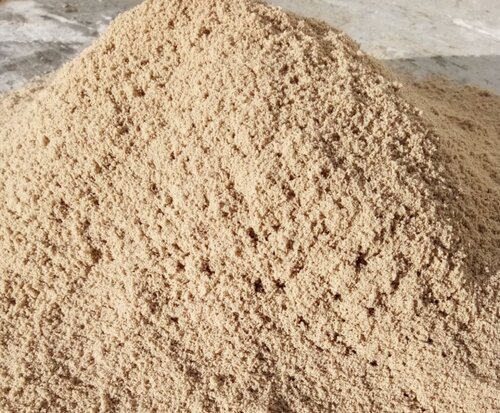
Finally at the end of the day I'm getting close.
Still difficult to push it through the sieve but the pile is much smoother and the holes much smaller.
I decided to empty my 50 L sand bin and put the drier top sand on the bottom and the wetter bottom sand on the top and let it overnight.
If things look good in the morning the next episode will be ramming up a molding flask.bottom sand.jpg

Before anyone suggests my crucible pourer is kak and the crucible is going to fall out...
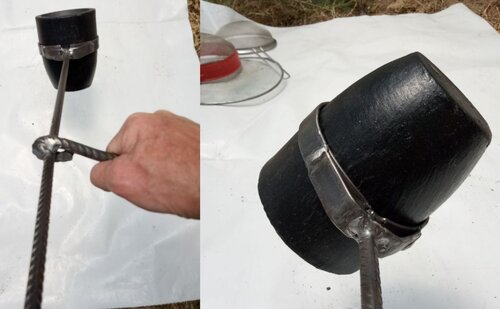
pouring test.jpg

uh uhhh, not today. :D


Whats it cost?
So far R1636 not including the unnecessary large paint stirrer and grout mixer.
 
Basically it starts with a furnace, mine I built some years ago as my son wanted one.
Buying a bag of refractory cement and using buckets as the form is the cheapest way to go. Some youtubers use those white insulation bricks that can be cut with a wood saw, but at R900 for 10 its gonna be an expensive build.

Im using a diaphragm pump and gravity drip car oil, so the brass valve with the red handle is a way of regulating the air and the large flow control hospital drip thingy is for controlling the oil drips. Its just bent aluminium with a nylon wheel on a SS shaft.
View attachment 215893

My main mission was finding a source for the molding sand(greensand), no success so I made my own.
AFS75 grade2 is the finest sand from Cape silica in Blackheath. (R204 for 40kg)
Eccabond N is bentonite powder from Serina Trading out Noordhoek way but collected in Bellville south. (R285 for 25kg)
View attachment 215894

The sand must be mixed with 7 to 10% clay or 7:1 by volume. I used a big paint stirrer (120mmx600mm) but my drill got rather hot, not knowing which one would be best, I bought all 3 types Brights hardware had, turned out the small 80x400 one worked best. (R104)
View attachment 215896

Some of the large tools I have sourced and made. The length of 6m rebar was R85 and I've used 4m so far for the 3 crucible tools on the right.
Salamander A4 crucible from https://www.gjsupplies.co.za/crucibles.html (R405)
Sieves are, 0.5mm at the top, its the large one from Makro, Chef's Kitchen 2-Pack Strainer (R129)
The red handle is a 1.6mm and the flat disk is a 1mm from Chinatown.
The paint stirrers from Brights, big is R145, small on on the right is R104 and the thingy in the middle is a H/Duty grout mixer at R79.95.
View attachment 215897

The small items are, parting powder bag I sewed myself, builders lime from Penny pinchers (R86 for 25kg)
Rubber mallet I've had for 10 years, was going to do wooden flooring but changed my mind.
Dunno what the tongs were for but they were in my dad's tools.
The small trowel (R39.50 ) and brushes were from PNA.
The wood sprue's, riser and sand rammer were made on the lathe, the tuning fork thingy I also welded up from some rebar.
View attachment 215900

The most difficult part so far has been getting the water amount in the greensand just right.
I use a knapsack sprayer from Brights (on special at R299 till 20 Dec 2020), its easy to use , works well and IMO is the last word in hand sprayers.
I had my sand too wet so its been drying in the sun for the last 2 days, rake and check, turn and dry.
View attachment 215901

A lot of Ytubers suggest the hand squeeze test, but its not always an accurate test.
One of the tubers I sub has been in the foundry business for the last 50 years and is my first stop for foundry related research, Olfoundryman at https://www.youtube.com/channel/UC90RoN_IjSRF18jAG0HIA6g.
His method involves rubbing the sand through a sieve and seeing how it falls.
My sand had a clean break but was still too wet to go through the sieve with the 1mm openings.
View attachment 215905

Some views of sieved sand, top pile is from the middle of my 40kg barrel, surface level is the bottom pile.

View attachment 215906


When the sand is too wet, it sticks where it falls giving the appearance of holes in a spiky pile.
View attachment 215907

Finally at the end of the day I'm getting close.
Still difficult to push it through the sieve but the pile is much smoother and the holes much smaller.
I decided to empty my 50 L sand bin and put the drier top sand on the bottom and the wetter bottom sand on the top and let it overnight.
If things look good in the morning the next episode will be ramming up a molding flask.View attachment 215909


Before anyone suggests my crucible pourer is kak and the crucible is going to fall out...
View attachment 215913

uh uhhh, not today. :D


Whats it cost?
So far R1636 not including the unnecessary large paint stirrer and grout mixer.
Well done and Awesome project your busy with. I hope the sand dries out , because I want to see the next step ASAP.
 
Sand still looks a bit on the damp side, but I'd risk working with it at this stage.
dampish sand.jpg

However, I thought it prudent to test the furnace and it didn't meet my expectations, it went out after an hour.
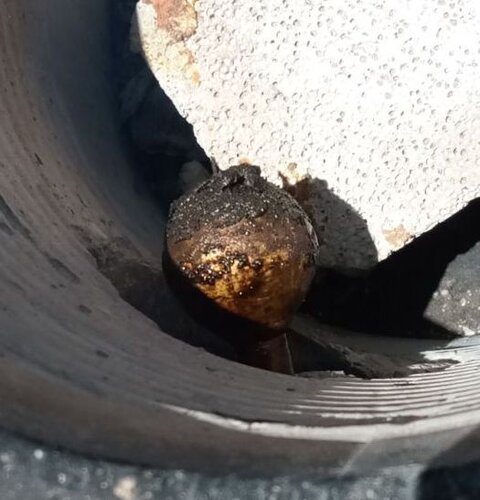
Turned out the jet was clogged with carbon build up, so I drilled it out from 1mm to 1.5mm and moved it 40mm closer to the furnace.
Its either closer or further away, so we'll start with closer first. :)
carboned jet.jpg

It seemed like it wasn't getting enough air at 200kpa, so I plumbed up my compressor and ruptured the silicone hose with a loud bang at 360kpa, fortunately I had some lpg hose to fix it.
ruptured silicone hose.jpg

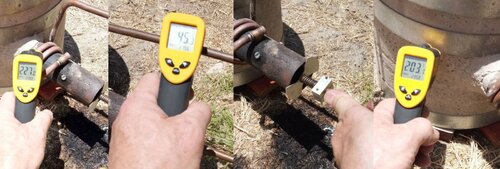
When its working , its works well with no smell or smoke, inside temps exceeded my 550ºC infrared temp gun.
Some of the outside temps.
temps.jpg

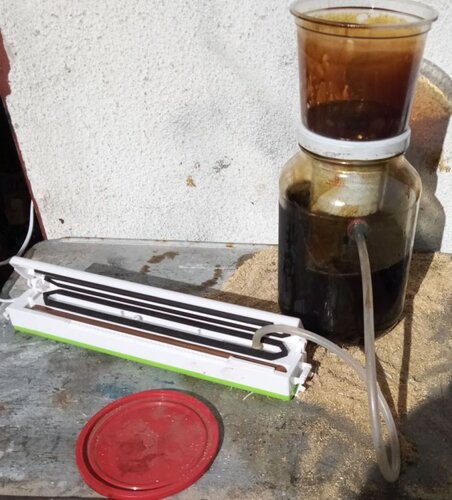
I also filtered the oil with a Harvey oil filter I made a few months back for my Royal Enfield Bullet which uses a felt oil filter.
harvey filter.jpg
 
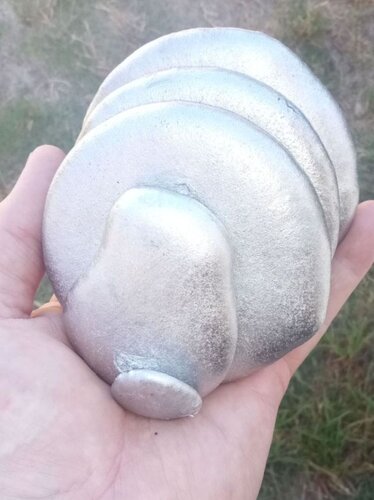
After much trials and tribulations, 3 versions and 2 seam ruptures that fired the furnace in reverse, I finally had my first successful melt and ingot pour.
Turns out the oil line was too hot and boiling off the lighter components leaving thick carbon sludge in the line which then blocked it solid.

850g of Al and 90 g of dross.
850 1st melt.jpg


There is some fine tuning to do as the furnace pulses a bit and opening up the oil flow or increasing air pressure doesnt eradicate it.
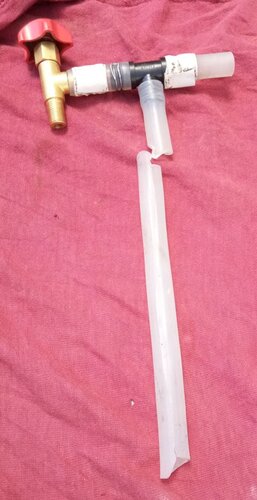
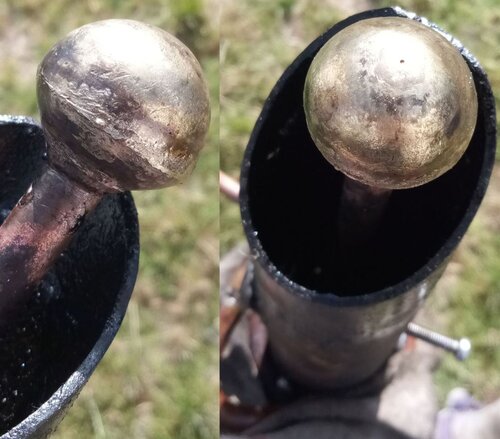
What works for me is a 20mm dia ball with a 0.5mm orifice inside a 43mm inside dia pipe.
The small ball needs more accurate positioning under the oil drips.
babs nozzle.jpg

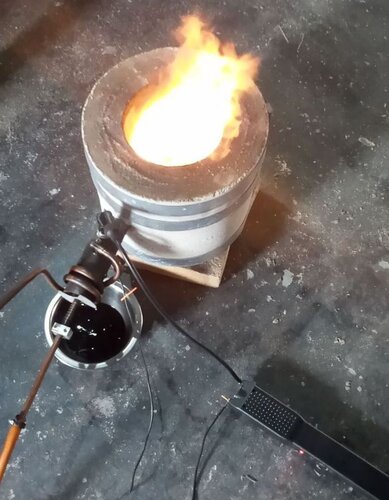
Roughly 20min till the metal started melting and I poured after another 15min.
running2.jpg

I tried a taser ignition, but it doesnt work that well from cold. I use a MAPP torch in the back to light it up and pre warm the oil coils.
Roughly a liter of oil was used for the 45min plus runtime.
 
Last edited:
After much trials and tribulations, 3 versions and 2 seam ruptures that fired the furnace in reverse, I finally had my first successful melt and ingot pour.
Turns out the oil line was too hot and boiling off the lighter components leaving thick carbon sludge in the line which then blocked it solid.

850g of Al and 90 g of dross.
View attachment 216903


There is some fine tuning to do as the furnace pulses a bit and opening up the oil flow or increasing air pressure doesnt eradicate it.
What works for me is a 20mm dia ball with a 0.5mm orifice inside a 43mm inside dia pipe.
The small ball needs more accurate positioning under the oil drips.
View attachment 216905

Roughly 20min till the metal started melting and I poured after another 15min.
View attachment 216906

I tried a taser ignition, but it doesnt work that well from cold. I use a MAPP torch in the back to light it up and pre warm the oil coils.
Roughly a liter of oil was used for the 45min plus runtime.

Kwai my bru.
A note on the ignition. If you remember the primus stove where the oil had to be heated to ignite with a little spirits.(suggestion)
Maybe ... You'll figure it out. You know what your doing. And awesome job.
 
Kwai my bru.
A note on the ignition. If you remember the primus stove where the oil had to be heated to ignite with a little spirits.(suggestion)
Maybe ... You'll figure it out. You know what your doing. And awesome job.

Yip, its the same here.
Another way is to mix in some turps or paraffin with the oil, or at least the first 100ml or so til it gets hot.
 
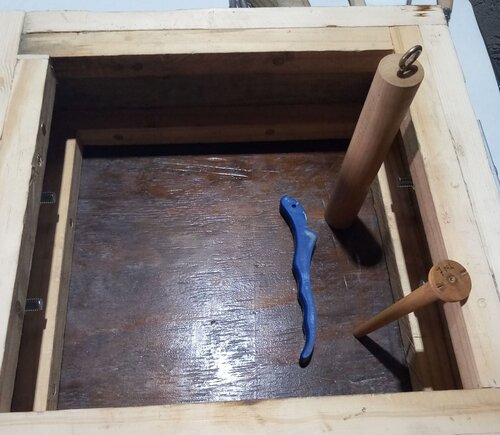
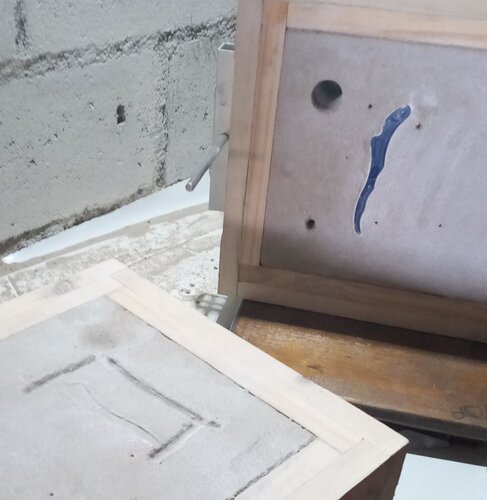
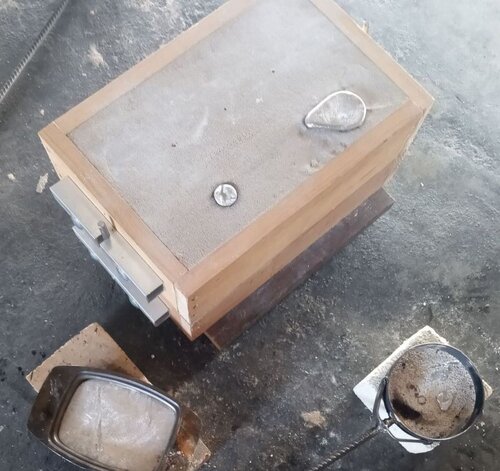
I wanted the part in the top section of the flask and the gates and runners in the bottom so that the part would be gravity fed and any reverse pulses from dead ends wouldn't affect metal flow in the part.
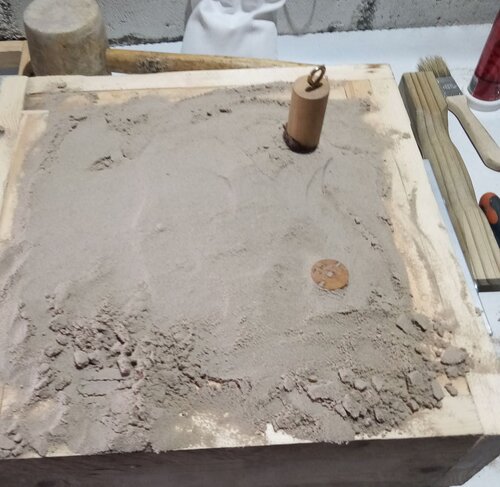
So I did what I think might be called "coping down". I start with the top(cope) then flip it upside down and ram the bottom (drag) on top of it.
flask molding 1.jpg

Rammed up with the tools of the trade in the background.
flask molding 2.jpg

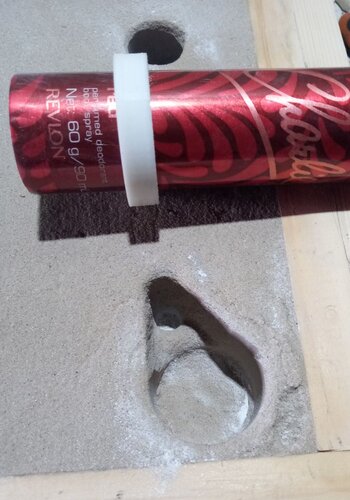
Next, after striking off the top level, cutting a pouring basin, that's a 3d printed ring that I hold down while withdrawing the can which keeps the edges neat. Everything gets dusted with builders lime.
flask molding4.jpg

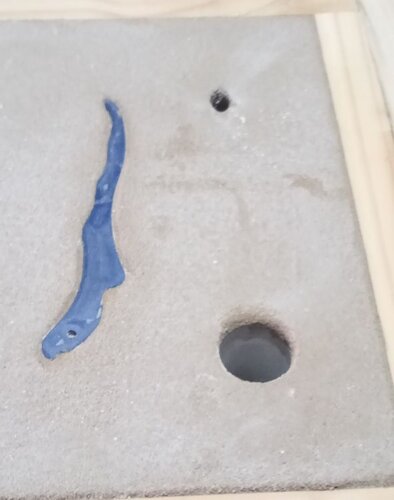
Turned over, dusted and edges rounded off on the sprue and riser feeds. The parting line was also cut down to make it easier to pull the part.
flask molding5.jpg


Gates and runners cut and dusted.
It was at this stage that I remembered that I didnt drill another hole to attach wood screws to do the pullout.
A lot of wiggling with one screw at the thicker end and it came out neatly.
flask molding6.jpg


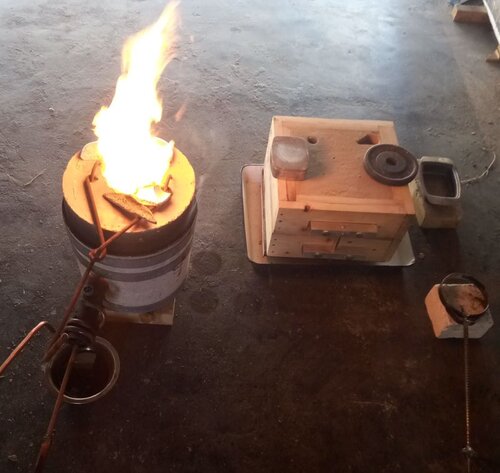
Running at full chat, first small pieces melted after 15min, added the rest of just over a kg in the next 10min and added borax flux 5min later.

A word on safety, I don't wear crocs or sloppies while pouring 750 deg C metal, I have safety boots, long sleeve denim shirt, blujeenz and red kevlar welders gloves met safety glasses.
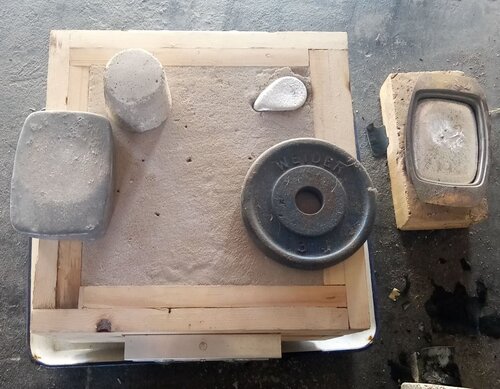
Everything is laid out so I don't trip over anything while carrying the crucible. Flask is in an enameled metal pan in case of metal leaks out the side, 7kg of weights on the top to stop hydro-static pressure from causing side leaks from the part line.
running 1.jpg

Pouring finished. Thats my idea of a thermal dome on the riser to keep it hotter (fluid) and feed metal to the part to combat shrinkage.
The whole shebang poured in about 3 chimpanzee's, about right for a small pour like this... just in case you were thinking the sprue was way too small.
poured1.jpg
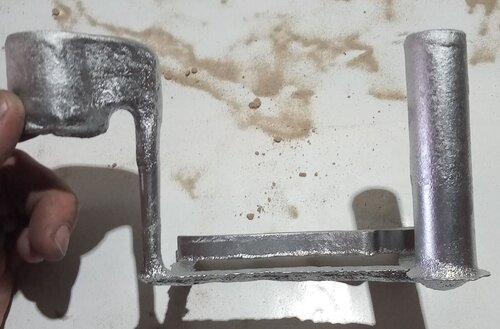
Out she comes. Profile view of my pouring basin with rounded edges on the shelf.
entire part1.jpg

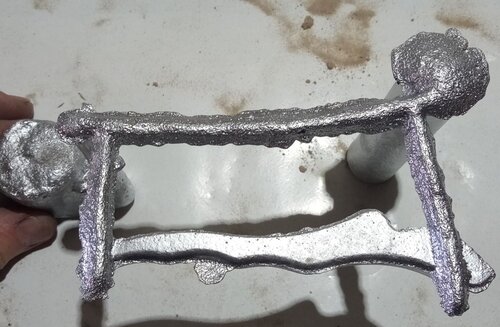
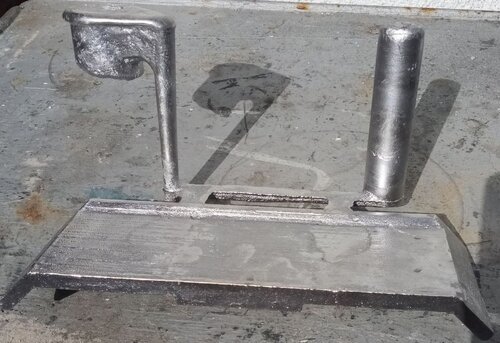
Bottom view with gates and runner attached. Riser on the right has a tangential runner entry, any air bubbles or rubbish gets swirled into the center of the riser and hopefully moves to the top. courtesy of Prof John Campbell.
entire part2.jpg

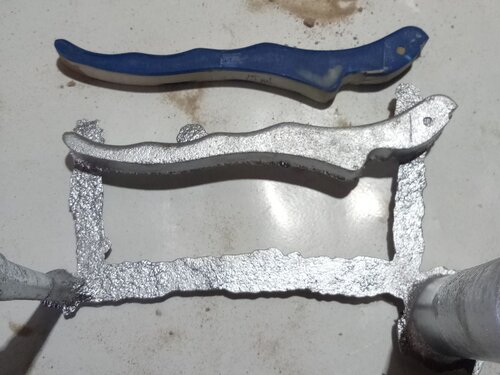
My plan seems to have worked with no porosity and minimal micro bubbles of approx 0.25mm dia.
entire part3.jpg

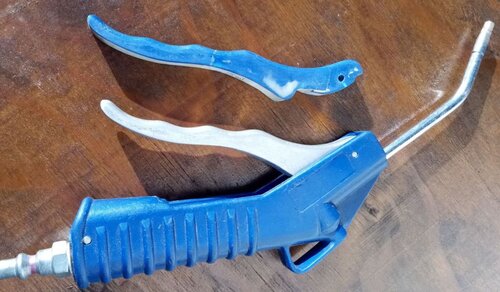
Now you might think it was a waste of time because Addendorf sells new airguns for 75 ront, but this one has variable action from a gentle puff to a strong blast, besides I still have 2 other broken ones.
When they slip off the bench and hit the ground, the nozzle usually breaks.
final part.jpg

For those of you who wondered what the 15ml and 7ml markings were all about, thats to calculate how much aluminium I'll need. I submerge them in water to measure their displacement in ml's and then x 2.4 to get weight in aluminium. 15ml for the plastic handle = 36grams of metal, after sanding I weighed the part and it came out at 37g.

35min runtime used 1l dirty oil, I still have 28l to get rid of, so a few more melts are in order. :)
 
Am i the only one disappointed that this thread isnt about Heavy Metal Music?
 
A chap at Pex foundry said I wouldnt be able to get the needed detail for a gear... in his opinion.
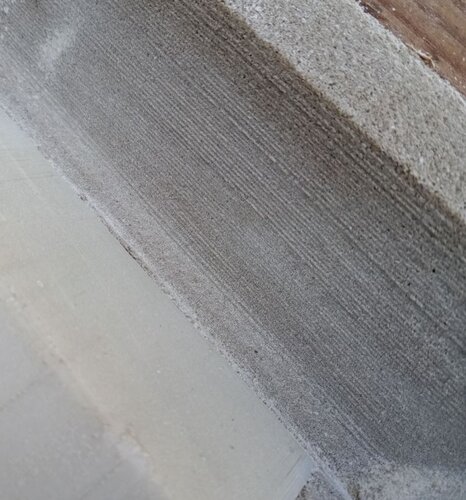
Well, I disagree, here's a closeup of a 3D printed pattern left in the sand mold, you can virtually count the layers.
Admittedly it was printed at a 0.4mm layer height which is a kind of coarse setting on a 3D printer.
layers sand.jpg

Another almost perfect pour, didnt even singe the wood flask, still pouring at cherry red which seems a bit hot.
Really need a decent thermocouple.
near perfect pour.jpg

Todays completed part.
Its a 200mm side of a 150x200 aluminium flask, still another 6 sides to do.
complete 200 as poured.jpg
 
A chap at Pex foundry said I wouldnt be able to get the needed detail for a gear... in his opinion.
Well, I disagree, here's a closeup of a 3D printed pattern left in the sand mold, you can virtually count the layers.
Admittedly it was printed at a 0.4mm layer height which is a kind of coarse setting on a 3D printer.
View attachment 217643

Another almost perfect pour, didnt even singe the wood flask, still pouring at cherry red which seems a bit hot.
Really need a decent thermocouple.
View attachment 217644

Todays completed part.
Its a 200mm side of a 150x200 aluminium flask, still another 6 sides to do.
View attachment 217645
It came out good in my opinion.
Awesome!
 
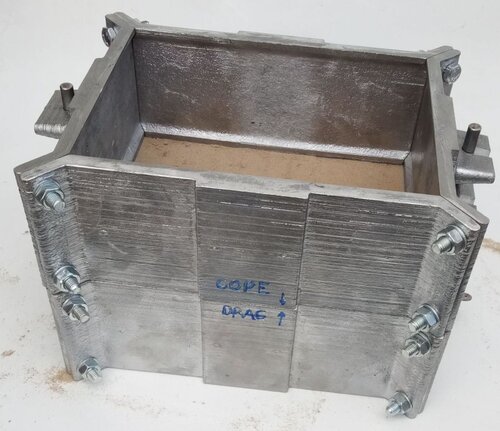
So, after a week and a half moering sand and pouring metal, I have a sieskat aluminium molding flask.
Its 150mmx200mm and weighs 10kg full of sand as opposed to the 20kg of my wooden flask.
Bonus is that it also rams up pretty quickly compared to the hour and a bit of the wooden one.

al flask 2.jpg

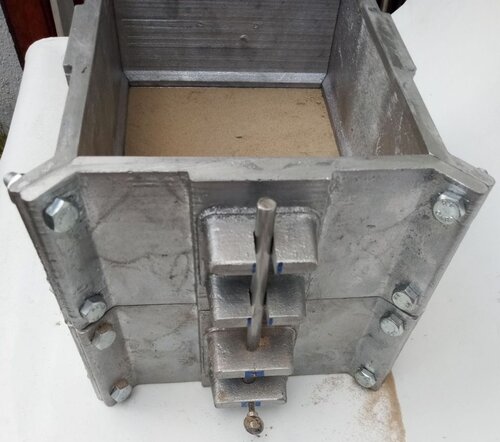
End view to show the slots which aid in easy locating of the 2 halves.
al flask 4.jpg
 
So, after a week and a half moering sand and pouring metal, I have a sieskat aluminium molding flask.
Its 150mmx200mm and weighs 10kg full of sand as opposed to the 20kg of my wooden flask.
Bonus is that it also rams up pretty quickly compared to the hour and a bit of the wooden one.

View attachment 218054

End view to show the slots which aid in easy locating of the 2 halves.
View attachment 218055
Sies-kat!
Daai lyk knap.
 
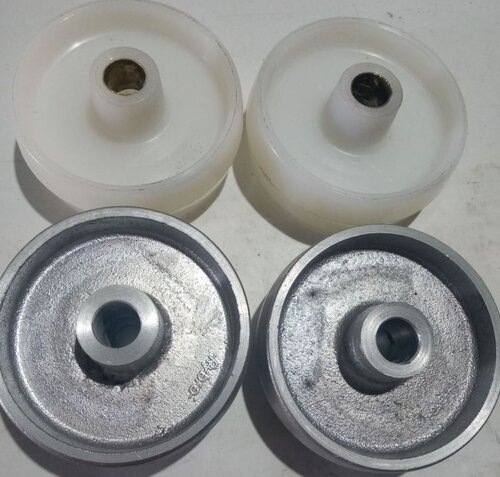
I needed nylon wheels for an indoor gas bottle hand trolley/cart and noticed in their description that they were "cast nylon". (R54 from Brights)
I was like "Hello Dolly", that means that the draft angles are spot on for a sand cast. Sure enough the part pulled easily from the sand and now I have 2 cast aluminium 75mm dia wheels, I wonder what Brights would have charged me for them if they'd had any.
Now I can make a trolley for my furnace and can just wheel it around with no risk of the wheels melting.
Some nice text detail on the finished part, mostly due to me using the finest silica sand, AFS #75.(grade2 from Cape Silica.)
cast wheels 75mm.jpg
 
I needed nylon wheels for an indoor gas bottle hand trolley/cart and noticed in their description that they were "cast nylon". (R54 from Brights)
I was like "Hello Dolly", that means that the draft angles are spot on for a sand cast. Sure enough the part pulled easily from the sand and now I have 2 cast aluminium 75mm dia wheels, I wonder what Brights would have charged me for them if they'd had any.
Now I can make a trolley for my furnace and can just wheel it around with no risk of the wheels melting.
Some nice text detail on the finished part, mostly due to me using the finest silica sand, AFS #75.(grade2 from Cape Silica.)
View attachment 219106
Awesome.
Those would cost around R250 each. That's what I paid for the metal with rubber tyre type.
I think we would also need to start sending you our empty beer cans.:D
 
Awesome.
Those would cost around R250 each. That's what I paid for the metal with rubber tyre type.
I think we would also need to start sending you our empty beer cans.:D

Thanks for the input, alas I dont use cheap cans for my pours, only the good stuff.
Clean cast aluminum from the scrapyard is R20 @ kg.
Simple answer is that they have a huge surface area to volume ratio which means more dross from the paint, oxides etc.
Some chap on YT did a pour and found a mere 60% recovery rate, that other 40% is dross, scraped out and thrown away.
Last point is that extruded Al, cans, window frames tubing has good extrusion properties but very poor for pouring ie casting.
Good to know. It's a good thing I dumped the tincans I accumulated.

What's the smallest you can cast with that fine silica sand.
 
Good to know. It's a good thing I dumped the tincans I accumulated.

What's the smallest you can cast with that fine silica sand.
By smallest I assume you mean detail, it did fine on the Rybro text which is 14mm x 5mm and about 0.21mm high, but it couldnt do the TM mark which seems to be about 2mm square
 
Last edited:
By smallest I assume you mean detail, it did fine on the Rybro text which is 14mm x 5mm and about 0.21mm high, but it counldnt do the TM mark which seems to be about 2mm square
That's good enough for me.
 
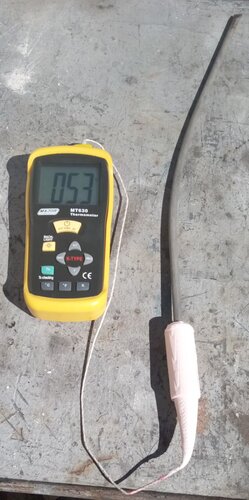
A very important tool is the thermocouple, you need to know what the metal pour temp is to get the best results.
I scored a very good condition 2nd hand MT630 on gumtree, but the probe had the cheapo glass fibre wrapped leads which is only good for
400 deg C.
My idea was to crimp the end of a 8mm OD ss tube, pop in the thermocouple and fill it up with refractory.
Seems to work fine, I've used a MAPP torch and got it up to 880 deg C.
IMG_20210202_155807.jpg
 
A very important tool is the thermocouple, you need to know what the metal pour temp is to get the best results.
I scored a very good condition 2nd hand MT630 on gumtree, but the probe had the cheapo glass fibre wrapped leads which is only good for
400 deg C.
My idea was to crimp the end of a 8mm OD ss tube, pop in the thermocouple and fill it up with refractory.
Seems to work fine, I've used a MAPP torch and got it up to 880 deg C.
View attachment 221152
Oh so that's what that was.
Cool!
 
Back
Top