Navigation
Install the app
How to install the app on iOS
Follow along with the video below to see how to install our site as a web app on your home screen.

Note: this_feature_currently_requires_accessing_site_using_safari
More options
You are using an out of date browser. It may not display this or other websites correctly.
You should upgrade or use an alternative browser.
You should upgrade or use an alternative browser.
Show Us Your Working Wick And Coil Setup
- Thread starter RIEFY
- Start date
- Status
- Not open for further replies.
Did a tripple coil in the ithaka to play with some juice.
1st up, some 5p queenside
Damn, looks like that GG hits hard! Awesome stuff!
Lets just put it this way, I can't vape an 18mg juice in the ithaka without loosing portions of my lungs from coughing.Damn, looks like that GG hits hard! Awesome stuff!
That said, without too much effort you can have a very smooth vape. chamber size is almost non-existent (when using the base feed system), and airflow is the best of any device I've ever touched.
Awesome @CraftyZA ! I must still try an Ithaka at some stage.Lets just put it this way, I can't vape an 18mg juice in the ithaka without loosing portions of my lungs from coughing.
That said, without too much effort you can have a very smooth vape. chamber size is almost non-existent (when using the base feed system), and airflow is the best of any device I've ever touched.
Next vape meetAwesome @CraftyZA ! I must still try an Ithaka at some stage.
Cool stuff! Must try it!Next vape meet
I picked up an ERA RDA from Vape King today and since I have been dying to do something other than a straight forward micro coil, decided to try my hand at a diamond coil.
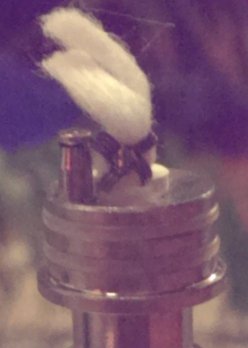
The coil is 28G Kanthal, wrapped on the tip of a needle tip bottle. 4 wraps per section. Came to 1.54ohms.
It's quite a potent vape with an excellent throat hit, but underwhelming vs the KFL+ in regards to flavour and vapour production. I definitely need to play around with this one some more, but that will wait till morning.
Yip, I managed to get a chimney coil in an evod cup.
That is awesome! Been meaning to do one of those for ages.
how does it vape? I hear that setup is unbelievable
Vapor production depends on airhole size as well. if I remember correctly those drippers are 1mm stock. open it to say 1.8mm and let me know the differenceI picked up an ERA RDA from Vape King today and since I have been dying to do something other than a straight forward micro coil, decided to try my hand at a diamond coil.
View attachment 3058
The coil is 28G Kanthal, wrapped on the tip of a needle tip bottle. 4 wraps per section. Came to 1.54ohms.
It's quite a potent vape with an excellent throat hit, but underwhelming vs the KFL+ in regards to flavour and vapour production. I definitely need to play around with this one some more, but that will wait till morning.
Sent from my GT-I9500 using Tapatalk
So I decided to mess around with coils tonight and well I like the coil in the video below but I do not own an RTA, so what do I do, see below.
Here are the pics of my build. 1.4ohms and it can be rewicked.
View attachment 3052 View attachment 3054 View attachment 3055 View attachment 3056
Yip, I managed to get a chimney coil in an evod cup.
Hey @BhavZ, i am now going to call you the mPT2 rebuildable master!
How is the vape on the chimney coil compared to a normal microcoil?
That is awesome! Been meaning to do one of those for ages.
how does it vape? I hear that setup is unbelievable
Hey @BhavZ, i am now going to call you the mPT2 rebuildable master!
How is the vape on the chimney coil compared to a normal microcoil?
Thanks @Silver for the awesome compliment.
The vape is awesome. I have noticed that the flavour is only slightly dulled compared to the standard horizontal micro coil (SHCC) but the vapor and throat hit is noticeably high than that of the standard horizontal micro coil.
Rewicking the coil is almost as easy as rewicking a SHCC and must say that chances of a leak or gurgle is significantly less than with the SHCC. I do notice that the atty gets a bit warmer faster with this coil setup but I attribute that to the fact that the heat is primarily being distributed to the sides of the atty where as with the SHCC the heat is being distributed primarily up and down.
Also the vape on the chimney vs SHCC at the wattage yields a cooler vape, and I am interpreting that to be due to how the heat is being distributed in the coil cup.
When wetting the wick for first time use I found that the technique of pouring juice on the wick from the slits in cup works a lot better than using the standard dripping method of pouring juice from the top. wetting the wick from the side as mentioned above prevents the opportunity of dropping juice down the center of the coil (where there is no wick).
All in all I am very happy with the setup and it most certainly vapes like a champ.
By all means dude.. you are most welcome to do so.Brilliant.
Maybe i should send you two mpT2's for the Bhavz conversion treatment
So I decided to mess around with coils tonight and well I like the coil in the video below but I do not own an RTA, so what do I do, see below.
Here are the pics of my build. 1.4ohms and it can be rewicked.
View attachment 3052 View attachment 3054 View attachment 3055 View attachment 3056
Yip, I managed to get a chimney coil in an evod cup.
Great stuff dude. I gave up on those as wicking was a pita. To much dry hit to little leakville delux. They do give a very nice hit tho. I also found it burns the insulator very quickly so careful with the dry burns. Let us know how it goes for you.
Sent from my GT-I9190 using Tapatalk
Well done man, that diamond coil is a lot harder to get right than one might think... And especially on that erd miniI picked up an ERA RDA from Vape King today and since I have been dying to do something other than a straight forward micro coil, decided to try my hand at a diamond coil.
View attachment 3058
The coil is 28G Kanthal, wrapped on the tip of a needle tip bottle. 4 wraps per section. Came to 1.54ohms.
It's quite a potent vape with an excellent throat hit, but underwhelming vs the KFL+ in regards to flavour and vapour production. I definitely need to play around with this one some more, but that will wait till morning.
So I decided to mess around with coils tonight and well I like the coil in the video below but I do not own an RTA, so what do I do, see below.
Here are the pics of my build. 1.4ohms and it can be rewicked.
View attachment 3052 View attachment 3054 View attachment 3055 View attachment 3056
Yip, I managed to get a chimney coil in an evod cup.
Wow, wow...is all I can say.
Thanks manWow, wow...is all I can say.
So I decided to mess around with coils tonight and well I like the coil in the video below but I do not own an RTA, so what do I do, see below.
Here are the pics of my build. 1.4ohms and it can be rewicked.
View attachment 3052 View attachment 3054 View attachment 3055 View attachment 3056
Yip, I managed to get a chimney coil in an evod cup.
nice one. tried one a few weeks ago but my issue came with bending the legs of the coil. think i need some small needle nose pliers or something. how did you do yours? the bending part i mean. also how did you keep the coil stable and in one piece whilst doing it
For me the trick was to build a micro coil with extra long legs, found it made things a lot easier when handling the coil.nice one. tried one a few weeks ago but my issue came with bending the legs of the coil. think i need some small needle nose pliers or something. how did you do yours? the bending part i mean. also how did you keep the coil stable and in one piece whilst doing it
For the leg that runs under the coil to bend it I put the screwdriver that I used to build the coil, through the coil and right up against the back of the screwdriver (my screwdriver has a bit of a lip) so it holds the coil in place.
With the coil against the lip of the screwdriver I used my index finger and thumb of the hand holding the screwdriver to keep the leg I was not bending in place, that allowed for leverage when bending the other leg (the leg that would be going under the coil). Here i used a sharp nose tweezer pinching as close to the coil as possible then bent it out so that when you hold the coil vertically it runs under the coil straight down into the cup.
The top leg that would run over was a bit easier for me as I didnt have to get too close to the coil as I needed the leg to do a bit of an arch and then run down parallel to the coil with out touching the coil. To get that arch what I did was take a flat nose tweezer and pinched the leg at the point where I want the bend to start so that the leg could run parallel to the coil and took a sharp nose tweezer to make the bend. tweek the leg in the same manner so that the leg is not higher than the coil as this will affect the amount of space that you have above the coil when you are putting the chimney back on.
Now that I have the two legs running parallel to each other I used my sharp nose tweezer to hold the coil in position and fitted the rubber insulator and positive pin. At this point the important issue is the height of the coil and not how far left or right it sits (this will be adjusted after).
Now that you have the coil seated in the cup and at the right height, insert the screwdriver into the coil again and position it so that it sits in the middle of the cup and over the air hole. That is it, test it for shorts and ensure that it is firing from the inside out.
For safety, when wicking the coil I put a piece of wick (cotton wool in my case) between the leg (that runs from the top of the coil) and the cup itself, acts as a cushion and prevents shorts. for wicking I used the same method as RipTrippers did and wrapped the wick around the coil.
As a side note one thing I do have to mention is that once you have the coil wicked and running please be careful on your first few drags, the throat hit catches you off guard and I did a silver shortly after giving the coil a run on a mech mod.
Hope that helps. If anything is unclear don't hesitate to give me a shout.
great explanation. i'l be sure to reread this once i get my paws on some more kanthal. now go make me a double twised chimney coil and don't forget to take pics as you're making it 
I can't wait to start making twisted coils but need to get my hands on a drill or a electric screwdriver with adjustable head then I will definitely be making twisted coils with loads of pics.great explanation. i'l be sure to reread this once i get my paws on some more kanthal. now go make me a double twised chimney coil and don't forget to take pics as you're making it
Thanks heavens for a Reo - that is far too involved for this untech.For me the trick was to build a micro coil with extra long legs, found it made things a lot easier when handling the coil.
For the leg that runs under the coil to bend it I put the screwdriver that I used to build the coil, through the coil and right up against the back of the screwdriver (my screwdriver has a bit of a lip) so it holds the coil in place.
With the coil against the lip of the screwdriver I used my index finger and thumb of the hand holding the screwdriver to keep the leg I was not bending in place, that allowed for leverage when bending the other leg (the leg that would be going under the coil). Here i used a sharp nose tweezer pinching as close to the coil as possible then bent it out so that when you hold the coil vertically it runs under the coil straight down into the cup.
The top leg that would run over was a bit easier for me as I didnt have to get too close to the coil as I needed the leg to do a bit of an arch and then run down parallel to the coil with out touching the coil. To get that arch what I did was take a flat nose tweezer and pinched the leg at the point where I want the bend to start so that the leg could run parallel to the coil and took a sharp nose tweezer to make the bend. tweek the leg in the same manner so that the leg is not higher than the coil as this will affect the amount of space that you have above the coil when you are putting the chimney back on.
Now that I have the two legs running parallel to each other I used my sharp nose tweezer to hold the coil in position and fitted the rubber insulator and positive pin. At this point the important issue is the height of the coil and not how far left or right it sits (this will be adjusted after).
Now that you have the coil seated in the cup and at the right height, insert the screwdriver into the coil again and position it so that it sits in the middle of the cup and over the air hole. That is it, test it for shorts and ensure that it is firing from the inside out.
For safety, when wicking the coil I put a piece of wick (cotton wool in my case) between the leg (that runs from the top of the coil) and the cup itself, acts as a cushion and prevents shorts. for wicking I used the same method as RipTrippers did and wrapped the wick around the coil.
As a side note one thing I do have to mention is that once you have the coil wicked and running please be careful on your first few drags, the throat hit catches you off guard and I did a silver shortly after giving the coil a run on a mech mod.
Hope that helps. If anything is unclear don't hesitate to give me a shout.
- Status
- Not open for further replies.
Similar threads
- Replies
- 1
- Views
- 1K
- Replies
- 5
- Views
- 2K
- Replies
- 0
- Views
- 903
- Replies
- 0
- Views
- 742


