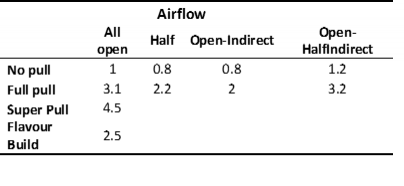
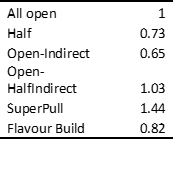
Mods: Don't know if this is the right place to put this? It is more general than temp-sensing, RDA or RBA... eitherway, move it where you feel it is the most appropriate!
Hello gentlefolk!
Disclaimer: This is a long wall-of-text (again!) of some very technical speculations I’ve been musing about the last couple of weeks. The first post is mostly an introduction to a problem I have, and then some very opinionated speculation. The second post has a few preliminary results on something I’ve been experimenting and working with. If you want, you can read the first few paragraphs, then skip to the second post which has some interesting results. Secondly, I mostly write these type of things out for my own sake - it helps clarify thinking. I figure I share it because maybe someone persistent enough to read through all of this will get a bit of clarification, or at least an idea. So either way, read at your own risk!
So one of the little (not so little) vaping puzzles which continues to boggle me is the relationship between coil size and wicking, airflow (direct and indirect), power output and juice composition. Specifically, how the coil-masters can get practically any atty to vape fantastically first try, whereas for the rest of us it involves multiple videos, opinions and a hell of a lot of experimentation with different builds to get certain attys to work. The master builders can seemingly guess how many wraps, what ID, and how much wick to give any new atty. I on the other hand, have to play around with different builds before finally stumbling (usually mostly accidently) onto something I like, and then I’m usually not sure how I did it. In fact, quite often a very small adjustment - such as changing coil position a little bit - seems to go a very long way. Now, maybe I just don’t have the touch - certain people, like the artists they are, can look at an atty and tell you what type of build it wants. Luckily for me, and everybody who lacks this magical gift, we have the wonders of Science! Unfortunately, science is surprisingly lacking in this area... hence this post (and hopefully, others to follow).
I’ve talked before about all the different factors which influence the final temperature of a vape, and these four factors (coil size and wicking, airflow, power output and juice composition) are far-and-by the biggest players. However, the effect of most of these factors are generally not quantifiable. Sure, we know how big our coils are, and we know what power we deliver, and we can even measure airflow holes and whatnot, but these factors still interplay in a complex fashion to give the final vape.
There is a simple reason why these things bug me, and why I want to know more. Whenever I watch a review of a new atomizer, the general comments are in the line of “Oh, the build deck is really large - you can throw massive 3.0 mm double-Zuma claptons on there.” This is only part of the picture though. We all know each atty likes certain builds over others. For instance, when you install identical builds on different atomizers and run it at the same power, you often get massively different vapes. Therefore, build deck size and airflow hole sizes (and features such as vortexing) are not enough to determine the output of an atty - you need to build/vape on one yourself before you get an idea of how it performs. Now, usually, you either a) google to find builds which work for most for a specific atty, or b) try different builds until you find one which works for you. This approach annoys the scientist within me, since I’m always thinking I might still stumble on an even better build, or, in the worst case scenario, I spent large amounts of time trying different builds on an atty trying to “fix” the vape to no avail. As an example, I have a Fishbone Plus RDA an a Crius v3 RTA which I have finally given up on - I know it works for a lot of vapers, but it just doesn’t fit my build-style. And for that matter, some attys just work, and some don’t. Some airy attys are great for flavour, whereas some surprisingly restricted attys blow great clouds. Some just work for certain people, whereas others find them horrible. And some builds are horribly hot on some attys, while unvapebly cold on others.
Now why is that, I wonder? I mean, in the age of powerful hybrid mods, building low/high resistance isn’t the biggest governing factor any more, since you can get wonderful and cloudy vapes at practically any resistance you choose. On the other hand, things like surface area and heat flux is a great guiding tool for the interested builder (and especially for dedicated flavour or cloud chasers), but it doesn’t always pan out - you can have a high surface area build and still not get a great vape. Finally, airflow control is also a funny thing. Sometimes, you get more clouds, or more flavour, with the airflow not fully open or minimally closed. Indirect airflow (such as on the drip tip, or on the atty itself) also changes the vape in sometimes unexpected ways - too much indirect airflow and you get almost no vape at all despite practically burning up your coil, but a little indirect airflow can occasionally work wonders.
Before I go on, as with almost everything I write, I know that these things don’t bother the average vaper. Tinkering with different builds, feeding the CUD, and generally playing around with all things vape-related is fun, and the reward of getting a great vape when not expecting it is very fulfilling. All of us also have our favourite builds for specific attys, which we don’t mess around with since it works. In the way that DIY E-juice isn’t chemistry, RBA-ing isn’t physics - and generally, so much the better for it. If everything vape-related were quantifiable, cloud chasing competitions would be more a thing of large-lunged engineers than us vapers.
But with that all said, every time I try a new build (regardless of whether it works well or not) I’m thinking of how these factors - coil, airflow, power output and juice composition - plays together to make or break a vape. And its begun to be a bit of an obsession - I’ve got a large spreadsheet of all the builds I’ve done thus far in 2016, including the calculated properties - surface area, heat flux and heat capacity - as well as some notes and thoughts on how it vaped. And I haven’t been able to find enough trends to satisfy my curiosity.
TL;DR: I need more quantifiable information on how coil build, airflow, power output and juice composition affects your final vape experience. To that purpose, I’ve created a new metric which I’m quite happy with. First a short premise on airflow
Airflow, and heat capacity
I’m not going to talk about surface area and heat flux here - I’ve got a few paragraphs on these in my TC guide, which you can go check out (in the signature). Generally though, a higher surface area means a lower heat flux - which generally means the coil can take more power, which generally means you’ll get more e-juice evaporated quicker. Ergo, more surface area = more vapour production, both clouds + flavour.
However, the surface area goes hand in hand with the airflow. And not just the direct (or indirect) airflow holes you can see on the side of an atty. Rather, the combined airflow within the atty - how it hits the coil, how easy it is to move around the coil & wick, and how long it actually stays in contact with the coil. In this regard, you cannot just maximize your surface area. Sometimes, a lower surface area build coupled with the correct atty and airflow produces a better vape! (I’m looking at you, Goblin Mini).
These two factors (surface area and total airflow) can be somewhat condensed into the effective heat capacity of a coil. Heat capacity is the amount of energy which is needed to heat your coil. High heat capacity (such as is typical for Clapton coils) need much more energy (power in W from your mod) to heat up than a small high-gauge micro coil. For fancy-ass mods and TC, this type of heat capacity isn’t a problem, since you can have a ramp-up power output to quickly get your coil hot.
However, this heat capacity (the one calculated on sites like www.steam-engine.org) is the heat capacity of your coil on its own - without air travelling over it, without wick and e-juice covering it, and without the energy which is absorbed when e-juice is evaporated. These things change the effective heat capacity of your coils while vaping.
For instance, consider juice composition. Each component of an e-juice has a heat capacity - in other words, how much heat is absorbed in chemical terms by each molecule. We can simplify this by just looking at the boiling points of each component. PG has a boiling point of ~188 deg C, whereas VG has a boiling point of ~290 deg C. Therefore, a high VG juice will need more energy - therefore higher power - to evaporate. So if you have a high VG juice in your atty, the effective heat capacity (henceforth EHC) of the coils will be slightly higher than if you had a high PG juice in the same atomizer, and you’ll need more power to give the same amount of vape (even though the clouds will be different due to different chemical properties of these components).
So to clear things up a bit, lets break down the physical processes which happen at each coil a bit:
And some other minor things, such as new (cooled) juice entering the wicks, and the atty itself absorbing heat, etc.
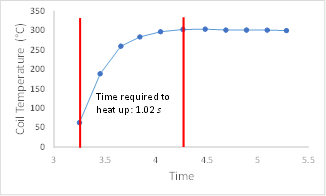
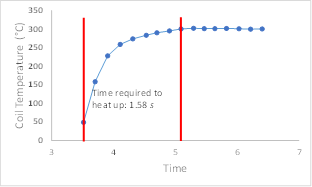
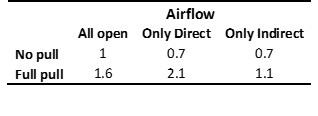
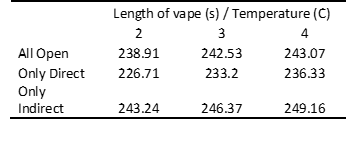
From the above list, only (a) increases the heat of the coil - both (b) and (c) decreases the heat. In the absence of (b) and (c) - in other words, an unwicked coil heating without pulling air over it- will continue heating up as much as it is physically feasible when we apply power to it. The tempo at which the coil heats up will be determined by the build, and the amount of power we apply. When we add (b) and (c) - in other words, when we vape on a wicked coil - we reduce the heat at the coil surface. Therefore, the tempo at which the coil heats up will be lowered. And this is where it gets interesting. The amount of heat absorbed by the airflow and the juice is dependent on the amount of heat already produced. As a result, when you just hit the fire button, the heat of a coil will increase at a fast tempo. As the heat of the coil increases, the heat absorbed by the juice and air will increase proportionally, decreasing the rate at which the coil’s temperature increases. Finally, a type of equilibrium will be reached - when the heat produced by the coil is evenly matched by the heat absorbed by the juice and airflow. At this stage, the coil’s temperature will remain constant. In reality, this never really happens, but rather the factors are almost balanced, resulting in the coil’s temperature increasing at a very small tempo. This temperature I’m calling the Max Equilibrium Temperature (MET). When we increase or decrease the power output, we are effectively changing the MET value. More power will result in the MET being higher. The MET will remain more or less constant until the juice in the wick runs out. Note that all of this discussion (including the MET value) is what happens at the coil - not the temperature you are experiencing at the drip-tip.
As an example, consider the following figures:

Follow the red line (temperature) in these figures. The first one is at 20 W. You can see a sharp, initial increase and then a general plateau at 221 deg C. Initially, the cooling effect (airflow + juice evaporation) isn’t large, and the coil only heats from the electron movement. As it heats up, the cooling effects become bigger, and an almost equilibrium is reached at the MET value of 221 deg C. The next picture is at 40 W. Here, the MET occurs at 254 deg C. The third at 50 W, with an MET of 273 deg C. Finally, the last one (at 60 W) has an MET above 300 deg C - where the cotton starts to singe. Cotton burning adds to the heat of the coil rather than subtracts from it, and a large spike in resistance is seen (and a large spike in lung pain for me).
To illustrate this concept even more, look at the following picture:
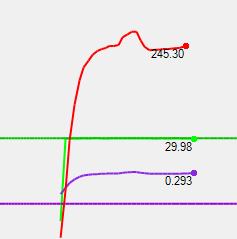
Here, vaping at 30 W, we arrive at an initial equilibrium of 245 deg C. Then I paused pulling air, and immediately the heating effects were dominant, resulting in an increase in temperature. Then I started drawing air again, and the equilibrium re-established itself.
These graphs clearly illustrate how heating is balanced against airflow (and juice evaporation). More heating (higher watts) resulted in the balance being shifted upward, as did a lapse in airflow. Specifically, the physical property which governs where the MET sits is the combination of the heat capacity of the coil and the power output - in other words, how quickly a coil is heated - and the cooling effects in play (evaporation and airflow) - in other words, how quickly a coil is cooled. I like to combine these two effects to give the effective heat capacity (EHC) which tells us how quickly a coil heats up when it has reached equilibrium.
So all of the above-mentioned factors (airflow, coil build, e-juice composition and power output) combine to give the EHC (effective heat capacity) for the current setup, which gives the tempo of how quickly a coil (of a specific material and build) heats up in a specific environment (in terms of airflow, ejuice composition and power output). It should be apparent that the EHC and MET are more or less inversely proportional - a setup with a high EHC (in other words, takes long to heat up in a specific environment) will have a lower MET (it will reach equilibrium between the heat produced by the coil and the heat absorbed by the juice + airflow at a low temperature) than a setup with a low EHC.
So why is the EHC and MET important? In principle, it takes into account all of the events happening at a coil. More power, less direct airflow, less surface area and higher PG content will decrease the EHC, and result in a higher MET. On the other hand, less power, more airflow, more surface area and higher VG content will increase the EHC, and decrease the MET. Therefore, if there was any way in which we could measure or estimate the EHC or MET, we would be able to use that to optimize and fix any builds we might consider, together with the holy grail of surface area.
For instance, suppose you have a vape which is generally weak, but slightly hot - you want to add more power, but doing so starts burning your coils. That means your MET is very close (or even above) the singing temperature of your wick, and your EHC is generally quite low. To get more vape you want to increase the surface area, but doing so might increase your coil size, blocking more airflow and decreasing your EHC even further. Therefore, considering a smaller, but twisted/claptonned coil will give you higher surface area with the same airflow (given sufficient wicking). Alternatively, doing compressed coils instead of spaced coils will give more or less the same surface area but taking less space, resulting in more airflow and a higher EHC and thereby lowering your MET. Or finally, if the coil is too close to the airflow holes, it might be blocking them somewhat - raising your coils can give more airflow, increasing the EHC and lowering MET.
Makes sense? I hope it does. At this stage, thinking in these terms already helps diagnosing a few atty problems you might encounter. Of course, we have no real way to estimate the EHC at the moment except qualitatively (in other words, how it ‘feels’), and therefore, everything above is untested speculation. A more measurable statistic would definitely be desirable! And to that end, I’ve experimented with a new metric which I hope would prove helpful - in the next post!
Side note: Temperature Control (TC) and Maximum Equilibrium Temperature (MET)
To some of you, the MET which I’ve described above might sound like the temperature limit you impose when doing TC vaping. In principle however, the MET is a naturally occurring temperature limit - and in practice, it doesn’t remain completely constant. With TC, we are enforcing our own limit on the atty, through wattage control. Therefore, if the MET and TC-limit are more or less in the same ball park, then you’ll have a great vape, since you are effectively keeping the temperature which results from the perfect balance of coil heating and airflow cooling exactly constant. However, most TC problems I’ve encountered myself or heard from others are when the TC limit you apply is very far from the MET - in other words, one element (whether it is power/coil or airflow) is off-balance with the rest of the setup.
Furthermore, TC and Kanthal works slightly different when cooling/airflow is discussed. In a Kanthal build, if you increase the cooling on a coil (either through internal airflow or an attys AFC, or whatever), you’ll generally get a colder vape, and you’ll need to up the power to keep up. On a TC build, on the other hand, if you increase the cooling but don’t change the temperature limit, you’ll get a stronger vape (since more power is needed to keep the temperature constant). On the other hand, the reverse is also true: less cooling on a Kanthal build will give a hotter vape, but in a TC build, it’ll just result in a weaker vape - since it reaches the temp limit quicker and less power is needed to sustain it.
Hello gentlefolk!
Disclaimer: This is a long wall-of-text (again!) of some very technical speculations I’ve been musing about the last couple of weeks. The first post is mostly an introduction to a problem I have, and then some very opinionated speculation. The second post has a few preliminary results on something I’ve been experimenting and working with. If you want, you can read the first few paragraphs, then skip to the second post which has some interesting results. Secondly, I mostly write these type of things out for my own sake - it helps clarify thinking. I figure I share it because maybe someone persistent enough to read through all of this will get a bit of clarification, or at least an idea. So either way, read at your own risk!
So one of the little (not so little) vaping puzzles which continues to boggle me is the relationship between coil size and wicking, airflow (direct and indirect), power output and juice composition. Specifically, how the coil-masters can get practically any atty to vape fantastically first try, whereas for the rest of us it involves multiple videos, opinions and a hell of a lot of experimentation with different builds to get certain attys to work. The master builders can seemingly guess how many wraps, what ID, and how much wick to give any new atty. I on the other hand, have to play around with different builds before finally stumbling (usually mostly accidently) onto something I like, and then I’m usually not sure how I did it. In fact, quite often a very small adjustment - such as changing coil position a little bit - seems to go a very long way. Now, maybe I just don’t have the touch - certain people, like the artists they are, can look at an atty and tell you what type of build it wants. Luckily for me, and everybody who lacks this magical gift, we have the wonders of Science! Unfortunately, science is surprisingly lacking in this area... hence this post (and hopefully, others to follow).
I’ve talked before about all the different factors which influence the final temperature of a vape, and these four factors (coil size and wicking, airflow, power output and juice composition) are far-and-by the biggest players. However, the effect of most of these factors are generally not quantifiable. Sure, we know how big our coils are, and we know what power we deliver, and we can even measure airflow holes and whatnot, but these factors still interplay in a complex fashion to give the final vape.
There is a simple reason why these things bug me, and why I want to know more. Whenever I watch a review of a new atomizer, the general comments are in the line of “Oh, the build deck is really large - you can throw massive 3.0 mm double-Zuma claptons on there.” This is only part of the picture though. We all know each atty likes certain builds over others. For instance, when you install identical builds on different atomizers and run it at the same power, you often get massively different vapes. Therefore, build deck size and airflow hole sizes (and features such as vortexing) are not enough to determine the output of an atty - you need to build/vape on one yourself before you get an idea of how it performs. Now, usually, you either a) google to find builds which work for most for a specific atty, or b) try different builds until you find one which works for you. This approach annoys the scientist within me, since I’m always thinking I might still stumble on an even better build, or, in the worst case scenario, I spent large amounts of time trying different builds on an atty trying to “fix” the vape to no avail. As an example, I have a Fishbone Plus RDA an a Crius v3 RTA which I have finally given up on - I know it works for a lot of vapers, but it just doesn’t fit my build-style. And for that matter, some attys just work, and some don’t. Some airy attys are great for flavour, whereas some surprisingly restricted attys blow great clouds. Some just work for certain people, whereas others find them horrible. And some builds are horribly hot on some attys, while unvapebly cold on others.
Now why is that, I wonder? I mean, in the age of powerful hybrid mods, building low/high resistance isn’t the biggest governing factor any more, since you can get wonderful and cloudy vapes at practically any resistance you choose. On the other hand, things like surface area and heat flux is a great guiding tool for the interested builder (and especially for dedicated flavour or cloud chasers), but it doesn’t always pan out - you can have a high surface area build and still not get a great vape. Finally, airflow control is also a funny thing. Sometimes, you get more clouds, or more flavour, with the airflow not fully open or minimally closed. Indirect airflow (such as on the drip tip, or on the atty itself) also changes the vape in sometimes unexpected ways - too much indirect airflow and you get almost no vape at all despite practically burning up your coil, but a little indirect airflow can occasionally work wonders.
Before I go on, as with almost everything I write, I know that these things don’t bother the average vaper. Tinkering with different builds, feeding the CUD, and generally playing around with all things vape-related is fun, and the reward of getting a great vape when not expecting it is very fulfilling. All of us also have our favourite builds for specific attys, which we don’t mess around with since it works. In the way that DIY E-juice isn’t chemistry, RBA-ing isn’t physics - and generally, so much the better for it. If everything vape-related were quantifiable, cloud chasing competitions would be more a thing of large-lunged engineers than us vapers.
But with that all said, every time I try a new build (regardless of whether it works well or not) I’m thinking of how these factors - coil, airflow, power output and juice composition - plays together to make or break a vape. And its begun to be a bit of an obsession - I’ve got a large spreadsheet of all the builds I’ve done thus far in 2016, including the calculated properties - surface area, heat flux and heat capacity - as well as some notes and thoughts on how it vaped. And I haven’t been able to find enough trends to satisfy my curiosity.
TL;DR: I need more quantifiable information on how coil build, airflow, power output and juice composition affects your final vape experience. To that purpose, I’ve created a new metric which I’m quite happy with. First a short premise on airflow
Airflow, and heat capacity
I’m not going to talk about surface area and heat flux here - I’ve got a few paragraphs on these in my TC guide, which you can go check out (in the signature). Generally though, a higher surface area means a lower heat flux - which generally means the coil can take more power, which generally means you’ll get more e-juice evaporated quicker. Ergo, more surface area = more vapour production, both clouds + flavour.
However, the surface area goes hand in hand with the airflow. And not just the direct (or indirect) airflow holes you can see on the side of an atty. Rather, the combined airflow within the atty - how it hits the coil, how easy it is to move around the coil & wick, and how long it actually stays in contact with the coil. In this regard, you cannot just maximize your surface area. Sometimes, a lower surface area build coupled with the correct atty and airflow produces a better vape! (I’m looking at you, Goblin Mini).
These two factors (surface area and total airflow) can be somewhat condensed into the effective heat capacity of a coil. Heat capacity is the amount of energy which is needed to heat your coil. High heat capacity (such as is typical for Clapton coils) need much more energy (power in W from your mod) to heat up than a small high-gauge micro coil. For fancy-ass mods and TC, this type of heat capacity isn’t a problem, since you can have a ramp-up power output to quickly get your coil hot.
However, this heat capacity (the one calculated on sites like www.steam-engine.org) is the heat capacity of your coil on its own - without air travelling over it, without wick and e-juice covering it, and without the energy which is absorbed when e-juice is evaporated. These things change the effective heat capacity of your coils while vaping.
For instance, consider juice composition. Each component of an e-juice has a heat capacity - in other words, how much heat is absorbed in chemical terms by each molecule. We can simplify this by just looking at the boiling points of each component. PG has a boiling point of ~188 deg C, whereas VG has a boiling point of ~290 deg C. Therefore, a high VG juice will need more energy - therefore higher power - to evaporate. So if you have a high VG juice in your atty, the effective heat capacity (henceforth EHC) of the coils will be slightly higher than if you had a high PG juice in the same atomizer, and you’ll need more power to give the same amount of vape (even though the clouds will be different due to different chemical properties of these components).
So to clear things up a bit, lets break down the physical processes which happen at each coil a bit:
- a) Electricity travels through a coil, causing the coil the heat up
- b) Heat is absorbed by the e-juice, causing evaporation
- c) Air travels over the coils, taking away any vaporized juice and cooling the coil/juice.
And some other minor things, such as new (cooled) juice entering the wicks, and the atty itself absorbing heat, etc.
From the above list, only (a) increases the heat of the coil - both (b) and (c) decreases the heat. In the absence of (b) and (c) - in other words, an unwicked coil heating without pulling air over it- will continue heating up as much as it is physically feasible when we apply power to it. The tempo at which the coil heats up will be determined by the build, and the amount of power we apply. When we add (b) and (c) - in other words, when we vape on a wicked coil - we reduce the heat at the coil surface. Therefore, the tempo at which the coil heats up will be lowered. And this is where it gets interesting. The amount of heat absorbed by the airflow and the juice is dependent on the amount of heat already produced. As a result, when you just hit the fire button, the heat of a coil will increase at a fast tempo. As the heat of the coil increases, the heat absorbed by the juice and air will increase proportionally, decreasing the rate at which the coil’s temperature increases. Finally, a type of equilibrium will be reached - when the heat produced by the coil is evenly matched by the heat absorbed by the juice and airflow. At this stage, the coil’s temperature will remain constant. In reality, this never really happens, but rather the factors are almost balanced, resulting in the coil’s temperature increasing at a very small tempo. This temperature I’m calling the Max Equilibrium Temperature (MET). When we increase or decrease the power output, we are effectively changing the MET value. More power will result in the MET being higher. The MET will remain more or less constant until the juice in the wick runs out. Note that all of this discussion (including the MET value) is what happens at the coil - not the temperature you are experiencing at the drip-tip.
As an example, consider the following figures:

Follow the red line (temperature) in these figures. The first one is at 20 W. You can see a sharp, initial increase and then a general plateau at 221 deg C. Initially, the cooling effect (airflow + juice evaporation) isn’t large, and the coil only heats from the electron movement. As it heats up, the cooling effects become bigger, and an almost equilibrium is reached at the MET value of 221 deg C. The next picture is at 40 W. Here, the MET occurs at 254 deg C. The third at 50 W, with an MET of 273 deg C. Finally, the last one (at 60 W) has an MET above 300 deg C - where the cotton starts to singe. Cotton burning adds to the heat of the coil rather than subtracts from it, and a large spike in resistance is seen (and a large spike in lung pain for me).
To illustrate this concept even more, look at the following picture:

Here, vaping at 30 W, we arrive at an initial equilibrium of 245 deg C. Then I paused pulling air, and immediately the heating effects were dominant, resulting in an increase in temperature. Then I started drawing air again, and the equilibrium re-established itself.
These graphs clearly illustrate how heating is balanced against airflow (and juice evaporation). More heating (higher watts) resulted in the balance being shifted upward, as did a lapse in airflow. Specifically, the physical property which governs where the MET sits is the combination of the heat capacity of the coil and the power output - in other words, how quickly a coil is heated - and the cooling effects in play (evaporation and airflow) - in other words, how quickly a coil is cooled. I like to combine these two effects to give the effective heat capacity (EHC) which tells us how quickly a coil heats up when it has reached equilibrium.
So all of the above-mentioned factors (airflow, coil build, e-juice composition and power output) combine to give the EHC (effective heat capacity) for the current setup, which gives the tempo of how quickly a coil (of a specific material and build) heats up in a specific environment (in terms of airflow, ejuice composition and power output). It should be apparent that the EHC and MET are more or less inversely proportional - a setup with a high EHC (in other words, takes long to heat up in a specific environment) will have a lower MET (it will reach equilibrium between the heat produced by the coil and the heat absorbed by the juice + airflow at a low temperature) than a setup with a low EHC.
So why is the EHC and MET important? In principle, it takes into account all of the events happening at a coil. More power, less direct airflow, less surface area and higher PG content will decrease the EHC, and result in a higher MET. On the other hand, less power, more airflow, more surface area and higher VG content will increase the EHC, and decrease the MET. Therefore, if there was any way in which we could measure or estimate the EHC or MET, we would be able to use that to optimize and fix any builds we might consider, together with the holy grail of surface area.
For instance, suppose you have a vape which is generally weak, but slightly hot - you want to add more power, but doing so starts burning your coils. That means your MET is very close (or even above) the singing temperature of your wick, and your EHC is generally quite low. To get more vape you want to increase the surface area, but doing so might increase your coil size, blocking more airflow and decreasing your EHC even further. Therefore, considering a smaller, but twisted/claptonned coil will give you higher surface area with the same airflow (given sufficient wicking). Alternatively, doing compressed coils instead of spaced coils will give more or less the same surface area but taking less space, resulting in more airflow and a higher EHC and thereby lowering your MET. Or finally, if the coil is too close to the airflow holes, it might be blocking them somewhat - raising your coils can give more airflow, increasing the EHC and lowering MET.
Makes sense? I hope it does. At this stage, thinking in these terms already helps diagnosing a few atty problems you might encounter. Of course, we have no real way to estimate the EHC at the moment except qualitatively (in other words, how it ‘feels’), and therefore, everything above is untested speculation. A more measurable statistic would definitely be desirable! And to that end, I’ve experimented with a new metric which I hope would prove helpful - in the next post!
Side note: Temperature Control (TC) and Maximum Equilibrium Temperature (MET)
To some of you, the MET which I’ve described above might sound like the temperature limit you impose when doing TC vaping. In principle however, the MET is a naturally occurring temperature limit - and in practice, it doesn’t remain completely constant. With TC, we are enforcing our own limit on the atty, through wattage control. Therefore, if the MET and TC-limit are more or less in the same ball park, then you’ll have a great vape, since you are effectively keeping the temperature which results from the perfect balance of coil heating and airflow cooling exactly constant. However, most TC problems I’ve encountered myself or heard from others are when the TC limit you apply is very far from the MET - in other words, one element (whether it is power/coil or airflow) is off-balance with the rest of the setup.
Furthermore, TC and Kanthal works slightly different when cooling/airflow is discussed. In a Kanthal build, if you increase the cooling on a coil (either through internal airflow or an attys AFC, or whatever), you’ll generally get a colder vape, and you’ll need to up the power to keep up. On a TC build, on the other hand, if you increase the cooling but don’t change the temperature limit, you’ll get a stronger vape (since more power is needed to keep the temperature constant). On the other hand, the reverse is also true: less cooling on a Kanthal build will give a hotter vape, but in a TC build, it’ll just result in a weaker vape - since it reaches the temp limit quicker and less power is needed to sustain it.


