VapeClub - Marquis RDA

Quick update for the guys waiting on the bottom feed modification, there is some bad news and good news.

Bad news first, the adjustable screw at the bottom will have to go. This adjustment screw is 1.9mm in diameter (excluding thread) and drilling it at 1.3mm destroys it. Made out of silver plated copper its just to soft to handle the force exerted. Going smaller than 1.3mm will make it difficult to get the higher VG juices through and still make for a very weak screw.

Good news, the actual centre pin screw is long enough to add a a delrin spacer of +- 2mm and still catch on the centre pin. This makes the 510 connector an acceptable 4.8mm long. I also mill three quarters of the bottom 1.3mm of the centre pin away to serve as a juice outlet/drain so the centre pin hole and centre pin screw's juice outlet do not have to line up.

The prototype unit should be done and tested tonight and I may be able to ship the first few tomorrow.

Apologies for the delay on this, it has proven quite a challenge.

PS: Thx to @Alex for the suggestion!
 
Wow @JakesSA
You are really on the ball! Well done
Vape modder of note - with the help of @Alex of course ;-)
 
Quick update for the guys waiting on the bottom feed modification, there is some bad news and good news.

Bad news first, the adjustable screw at the bottom will have to go. This adjustment screw is 1.9mm in diameter (excluding thread) and drilling it at 1.3mm destroys it. Made out of silver plated copper its just to soft to handle the force exerted. Going smaller than 1.3mm will make it difficult to get the higher VG juices through and still make for a very weak screw.

Good news, the actual centre pin screw is long enough to add a a delrin spacer of +- 2mm and still catch on the centre pin. This makes the 510 connector an acceptable 4.8mm long. I also mill three quarters of the bottom 1.3mm of the centre pin away to serve as a juice outlet/drain so the centre pin hole and centre pin screw's juice outlet do not have to line up.

The prototype unit should be done and tested tonight and I may be able to ship the first few tomorrow.

Apologies for the delay on this, it has proven quite a challenge.

PS: Thx to @Alex for the suggestion!
Sounds like all good news to me. Thx for all your trouble. Hoping the prototype comes through with flying colours.
 
Last edited:
Great news @JakesSA and well done to @Alex for helping out :rock:

Can't wait for the Reonauts to get onto this atty. Its mighty impressive! I have been using mine non stop since i got it.
 
Cant keep up with you guys
First its the Odin, then the Nuppin, now the Marquis
Not to mention all the other stuff @Paulie has said I need to try
Lol

Never ending
 
Cant keep up with you guys
First its the Odin, then the Nuppin, now the Marquis
Not to mention all the other stuff @Paulie has said I need to try
Lol

Never ending

And now the Derringer has SA in its sights .. just when I get used to doing a BF mod on a certain type of attie the next one knocks on the door! ;)
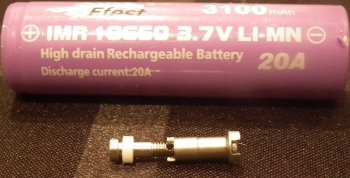
 
Right I have the prototype ready, I have some concerns with the centre post so I am going to ask @Alex if he has some time to test it for me? Please @Alex! :)

The full extent of the modification is pictured below with battery for scale. Since I am discarding the depth adjustment screw the centre pin screw needs to be 'extended' somewhat. This is achieved by adding an acetal spacer to the centre pin screw which is just under 2.0mm. The screw is drilled through and centre drilled to form the juice channel. The centre posts has it's bottom milled away on both sides leaving 2 independent 'pillars' to stand on. You can see these above and below the drain opening. I initially wanted to leave only one pillar so as not to interfere with the centre screw hole but the centre pin then tends to pull to the side when tightening.


centre pin marquis.jpg

Under magnification I notice that my Efest wrapping is slightly torn .. :confused:
 
Right I have the prototype ready, I have some concerns with the centre post so I am going to ask @Alex if he has some time to test it for me? Please @Alex! :)

The full extent of the modification is pictured below with battery for scale. Since I am discarding the depth adjustment screw the centre pin screw needs to be 'extended' somewhat. This is achieved by adding an acetal spacer to the centre pin screw which is just under 2.0mm. The screw is drilled through and centre drilled to form the juice channel. The centre posts has it's bottom milled away on both sides leaving 2 independent 'pillars' to stand on. You can see these above and below the drain opening. I initially wanted to leave only one pillar so as not to interfere with the centre screw hole but the centre pin then tends to pull to the side when tightening.


View attachment 20711

Under magnification I notice that my Efest wrapping is slightly torn .. :confused:
Sure thing


Message sent via tapatalk
 
Pretty but not practical it turns out, @Alex confirms that the centre post tends to pull skew now that half of its base is removed. I'm running out of practical ideas now so if anyone has suggestions .. I am all ears! :whew:

Thanks for the help @Alex!
 
Pretty but not practical it turns out, @Alex confirms that the centre post tends to pull skew now that half of its base is removed. I'm running out of practical ideas now so if anyone has suggestions .. I am all ears! :whew:

Thanks for the help @Alex!

Only thing I can think of is longitudinal slots, but I say this without seeing the center pin.
 
An easy solution is to leave the centre pin as is and raise the juice exit hole to above the centre pin screw's height, but that woul be +- 2.5mm above deck level which will affect the draining.
 
Only thing I can think of is longitudinal slots, but I say this without seeing the center pin.

My drawing skills suck big time, but something like this.

2f7d5a4d9e148d2947930e2232b39c31.jpg
 
Is the inner circle the screw and the outer circle the post?

Nope, it's just the post, sorry for my crappy drawing. The yellow sections indicate the cutouts
 
Biggest worry is alignment between the centre pin screw holes (its drilled straight through) and those slots. Ideally the openings should not be opposite one another so that if the one side ends up blocking the hole the other side is open. That means 3 or 5 slots .. I think.
 
I know what you mean, makes perfect sense, if it's easy enough to cutout.
 
Back
Top