FIRST time ever reviewing a battery charger. Now I loaned my scope out, so NO deep diving in this review, but you'll know pretty much everything you need to know anyway. Quite frankly, @SmilingOgre is the guy you want for that. :slight_smile:
Thanks out to Lily at XTAR for sending this out for review, as well as @Old_Goat for sending her my way. Lot's to cover with this one, so let's dive in.
Features:
* Real time charging display including voltage, current, and charged capacity (except for 1.5V Li-ion due to how they work).
* 3Ax1/2Ax2/1Ax4/0.5Ax4/0.25Ax4 charging currents.
* Automated charging current (based on power input, number of batteries, and internal resistance).
* Low voltage battery recovery.
* TC-CC-CV charging for Li-ion.
* Multiple protection technologies.
* USB-C charging (20W PD recommended, 5V 2A or QC3.0 with performance limitations).
* Capacity testing / grading (on discharge) for all battery types.
Compatibility:
* 3.6/3.7V Li-ion (4.2V max)
* 3.2V LiFePO4 (3.65V max)
* 10440,14500,14650, 16340, 17335, 17500, 17670, 18350, 18490, 18500, 18650, 18700, 20700, 21700, 22650, 25500, 26650, 32650
* 1.5V Li-ion AA, and AAA
* 1.2V NiMH AAA, AA, A, SC, C, and D
One of the bigger selling points was the Capacity tester function, including AA, and AAA.

LOTS of size and chemistry compatibility with this one.

Love the manual charging current options (limited by amount of bays in use).

3 stage charging, including an initial low charge "wakeup".

Low and/or dead cell recovery.

And of course, a plethora of protections.

Standard packaging, with good labeling.


Lily shipped me the kit, which included the PD20W charger.

Poster style User's Guide, and compatibility chart.

The VX4 was big enough to charge almost any cells.

With no fans, the VX4 used vents on the back ...

and sides .....

USB-C power input.

The slides were looser than expected, but held every battery tested firmly.

The buttons were clearly laid out, but not illuminated, and had dual functions (tap, long press).
C/V button:
* Single Press - changes charging current levels (high to low steps, the charger may automatically limit the maximum allowed current).
* Long Press - switches between normal (3.6/3.7V Li-ion) and (3.2V) LiFePO4 modes.
Mode button:
* Single Press (during charging) - switches display between real time charging current and charged capacity.
* Long press (during charging) - switches between charging and capacity testing modes.
mWh/mAh button:
* Single Press (during 1.5V Li-ion) - switches between mWh and mAh display during 1.5V capacity testing.
* Long press - turns off backlight.

The display was bright and easy to read, and only got slightly cloudy when viewing off axis.

I tested EVERY size of battery I had in my arsenal on the VX4, including flat tops,and button tops.

It had no trouble running multiple sizes at the same time, and even with the 20700, there was room left.

Once I started with my 18650, and 21700 tests, I noticed the inner bays were closer together.

While only slightly harder to insert/remove, a full 21700 load showcased the inner bay spacing.

And yes, I did torture it a bit with some AAA's.

Mixed chemistry was also a non-issue:

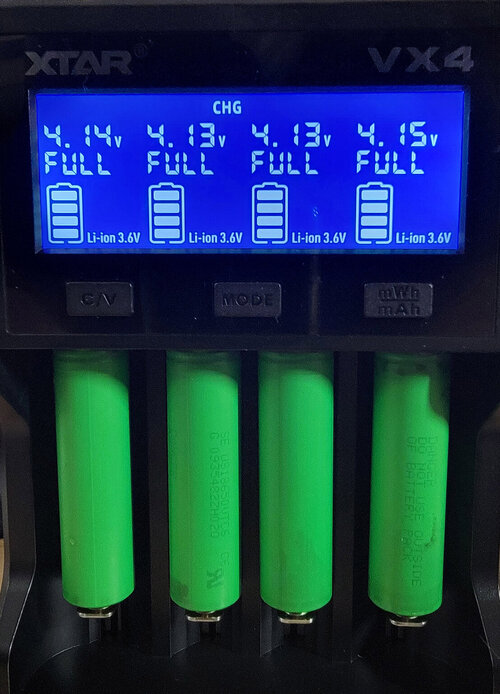
When charging the real time charging current and voltage was available.

When complete.

The grading (capacity testing) took quite a while on the bigger batts, but when done, your mAh were presented.


For one of my final "torture tests", I threw in a particularly finicky 18350 that my go to Opus refused to charge. At first it identified it as an Ni-MH ...

But quickly corrected it ...