The Ammit 25 thread

I'm getting the opposite now with the spitback lol.
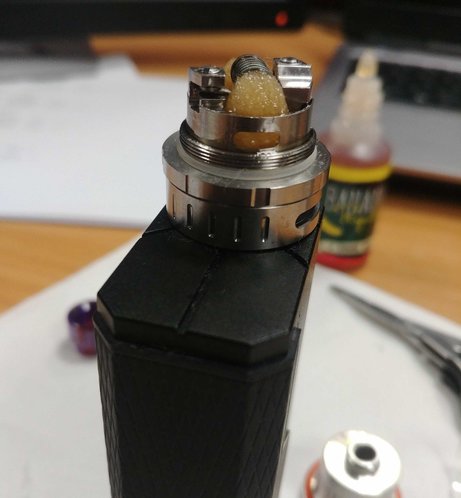
I figured out the Ammit's dry hits at least. The problem is with the tails touching the juice well's deck. It should just cover the top and dangle down halfway at most, then youre' fine. Even with super-thin cotton, if the tails are too long they slam into the juice well's wicking holes when the vacuum forms, and create a seal.

Just out of curiosity, do you begin to inhale a split second before firing the coil? Because that's how I've always done it.
 
Just out of curiosity, do you begin to inhale a split second before firing the coil? Because that's how I've always done it.
Hm no, I usually fire for a split second before I start inhaling
 
I experimented with the tail length yesterday. When I had it shorter it would create large bubbles that got stuck unless I turned the tank to a 45degree angle.
The way the guy from Vaper's Corner wicked it the tails were touching the deck and it was created a bunch of smaller bubbles regardless of the orientation. I'm trying to reproduce that because that was an absolutely excellent vaping experience.
My attempt with shorter tails and bigger bubbles also created gurgling/spitback.
Oh and my Waternana tastes like perfume/potpourri so definitely doing the Dry Hits & Kak Mix thing currently :p haha
Lol agh nee. If you're sensitive to watermelon, you're going to be missing out on a wide range of flavour profiles - hope that's not the case.
The vacuum does pull the cotton tails down a bit though. For instance, mine was about halfway down the juice well. By the time the tank formed the vacuum, both tails were pulled to the bottom of the deck, but not so much that it sealed the wicking holes. What helps is to bring the cotton into the juice well with a kind of a "bow", like: (see attachment for epic drawing skillz)
You then create a bit of play.
Not saying this is the foolproof way to do it, just that that's how I eliminated dry hits on my side. I do have the spitback issue though (one maybe two pops per puff) so there's that to consider :p
 

Attachments

  • sketch_598970e61d9da.png
    sketch_598970e61d9da.png
    3.7 KB · Views: 31
I'm going to rebuild my Ammit 25 and new wicks, I'll take pics and post them. Hopefully that can help @TheV and @aktorsyl out - I've never had a leak or a dry hit with this tank which is very rare.
Flavour is so good but coil placement is critical, too high and you get alot less flavour, too low and the airflow gets restricted too much. I lower my coil as low as the deck will allow before the rod cant push the coil lower. I find this is the perfect height. Wicking as like all my other atty's - not too loose and not tight, use the back of my tweezers to fluff up the tails, thin them a little so that left and right are even (OCD here) then trim just long enough so the tails touch the bottom of the juice well (not packed in there but just placed gently)

Pic's to follow shortly...
 
Thank you @aktorsyl and @Greyz. I appreciate the information.
I think one of the things I still have to get right is the "not too loose and not tight" part of the wicking. I'm pretty new to all this and I don't really have a point of reference.
As far as I understand there must be resistance but it should not actually bend the coil out of place. I don't know if this is the right way to approach the initial wicking, but that is what I do.
I am on the upper limit of this though. I usually start with too much cotton and then work my way down to where I can just start pulling it through without deforming the coil. Don't know if this is a problem.
I'm on a mission to rebuild the Reload until I get it right! :D
Wait until you use Streaky Cotton.. you'll very quickly learn how much is too much :p It's so soft that it pulls apart if you pull it through the coil and it's too tight.
 
Wait until you use Streaky Cotton.. you'll very quickly learn how much is too much :p It's so soft that it pulls apart if you pull it through the coil and it's too tight.
I'm currently using streaky cotton, and yes it does pull apart quite easily :)
So if I get the streaky cotton through does it mean it is "just right"?
 
I'm currently using streaky cotton, and yes it does pull apart quite easily :)
So if I get the streaky cotton through does it mean it is "just right"?
I thin it out a biiiit more so that I can pull it without massive resistance. However, with Streaky Cotton I don't pull it back & forth like I did with CBv2, because it would break apart if I tried. Just one direction, and back half a centimeter, and done.

Streaky Cotton has so much air in it that I doubt you can easily go "too tight" on it.
 
Lol agh nee. If you're sensitive to watermelon, you're going to be missing out on a wide range of flavour profiles - hope that's not the case.
The vacuum does pull the cotton tails down a bit though. For instance, mine was about halfway down the juice well. By the time the tank formed the vacuum, both tails were pulled to the bottom of the deck, but not so much that it sealed the wicking holes. What helps is to bring the cotton into the juice well with a kind of a "bow", like: (see attachment for epic drawing skillz)
You then create a bit of play.
Not saying this is the foolproof way to do it, just that that's how I eliminated dry hits on my side. I do have the spitback issue though (one maybe two pops per puff) so there's that to consider :p
Regarding the watermelon. I'll give it some time to steep, see if the flavor changes.
I'll also make a second batch with 2% and 2% instead of 3% and 1% to see how that would out for me.
I like watermelon, but this currently has an overly chemical perfume taste to it.
 
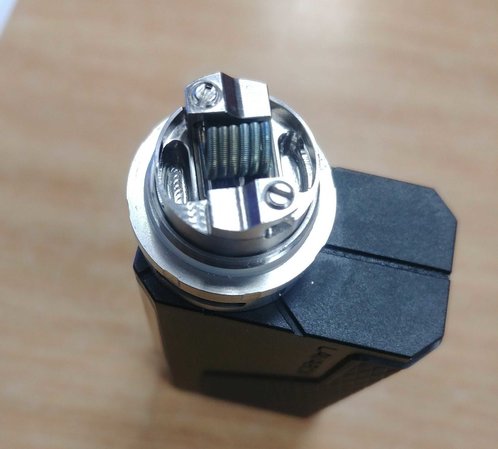
@TheV I know I'm late to the pics party, work got in the way but nonetheless here comes my coil placement and wicking method for the Ammit 25.

Lets start the journey with a lovely 6 wrap 22G Flatwire Ni80 Clapton'd with 38G Ni 80 (made by UK Flatwire).
Coil placement on this thing is so easy, they say it's what Stevie Wonder vapes on.....

The perfect coil height is easily achievable - I dry burn the coil first then lower it as much as I can until the screwdriver\drill bit hits the deck then leave it there. The coils bottom should sit about 1-2mm above bottom airflow and the bottom third of the coil should be getting some 3D airflow action from the side airflow.
20170808_113012.jpg

Wicking, so here's the bit where I think the dry hits are stemming from.
My wicking ritual, I tear off some JellyFish Cotton (Streaky or Bacon works fine too), roll it between my fingers like rolling a cig, then tghtly twist one end, feed the tighlty twisted end in first and pull through the coil till it gets tight, then back out 4-5mm so it a little looser.
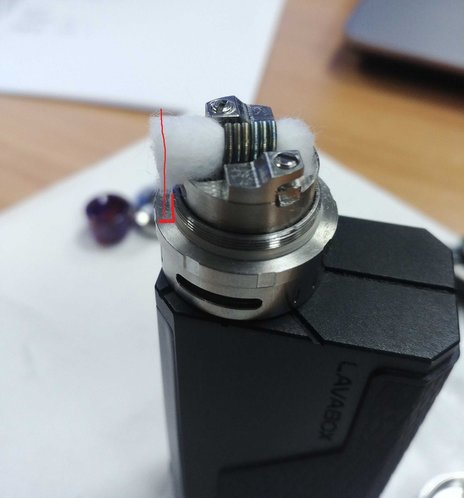
I place the scissors against the thread and on the ledge and cut (see red lines on image below - yes my artistic skils are poor, moving on). I use the back of the tweezers to fluff up the tails and thin them out. 3mm coil requires no thininng just a nice fluff and she's good. 3.mm and up need the tails thinned a little as you don't want to jam pack your cotton in those wells.
20170808_114626.jpg

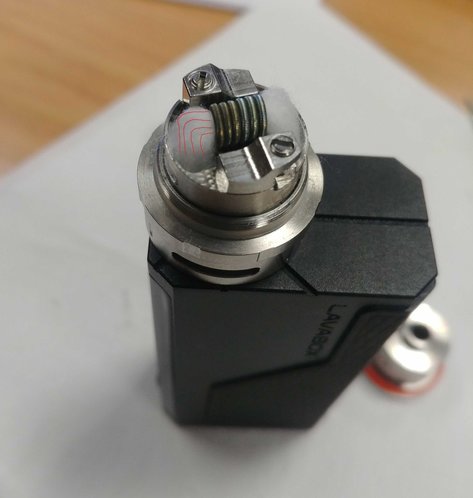
Using my bent tweezers I lift and place the cotton into the juice wells, the trick comes in making sure the tails ends are standing in the juice well. I wish I could explain it better than that, I hope the pic and red lines help LOL
20170808_114817.jpg

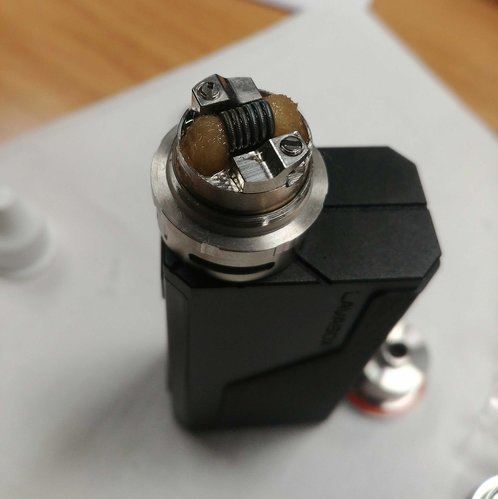
Now all thats left if to prime your wicks and your good to go. Now after thinning you might be tempted to think this isn't enough cotton, this thing will leak but it won't the cotton swells when wicked and fills the wells up so there is no leaking.
20170808_115009.jpg

Side view showing the tails just touching the bottom of the juice wells.
20170808_115046.jpg

I really hope this helps anyone who is battling with their Ammit 25 because eveyone should enjoy this amazing single coil RTA. #flavourflave
 
Haven't had dry hits
But it leaks
When filling juice, it comes out and comes out between airflow ring and rind above it....

Seems like it's dripper time

Haven't had a single tank that doesn't eventually leak

Sent from my Redmi Note 3 using Tapatalk
 
Haven't had dry hits
But it leaks
When filling juice, it comes out and comes out between airflow ring and rind above it....

Seems like it's dripper time

Haven't had a single tank that doesn't eventually leak

Sent from my Redmi Note 3 using Tapatalk

Assuming your juice flow is closed when filling, just a stab in the dark here but have you checked your 510 pin? My Ammit 25 510 pin still turned a full half turn before it was proper tight. When I bought the tank I noticed it shared the same airflow as the Kylin so first thing I did was to check and tighten the 510.
I've had no leaking from the Ammit 25 in the month or so I have owned it (touchwood)
 
@TheV I know I'm late to the pics party, work got in the way but nonetheless here comes my coil placement and wicking method for the Ammit 25.

Lets start the journey with a lovely 6 wrap 22G Flatwire Ni80 Clapton'd with 38G Ni 80 (made by UK Flatwire).
Coil placement on this thing is so easy, they say it's what Stevie Wonder vapes on.....

The perfect coil height is easily achievable - I dry burn the coil first then lower it as much as I can until the screwdriver\drill bit hits the deck then leave it there. The coils bottom should sit about 1-2mm above bottom airflow and the bottom third of the coil should be getting some 3D airflow action from the side airflow.
View attachment 103810

Wicking, so here's the bit where I think the dry hits are stemming from.
My wicking ritual, I tear off some JellyFish Cotton (Streaky or Bacon works fine too), roll it between my fingers like rolling a cig, then tghtly twist one end, feed the tighlty twisted end in first and pull through the coil till it gets tight, then back out 4-5mm so it a little looser.
I place the scissors against the thread and on the ledge and cut (see red lines on image below - yes my artistic skils are poor, moving on). I use the back of the tweezers to fluff up the tails and thin them out. 3mm coil requires no thininng just a nice fluff and she's good. 3.mm and up need the tails thinned a little as you don't want to jam pack your cotton in those wells.
View attachment 103817

Using my bent tweezers I lift and place the cotton into the juice wells, the trick comes in making sure the tails ends are standing in the juice well. I wish I could explain it better than that, I hope the pic and red lines help LOL
View attachment 103818

Now all thats left if to prime your wicks and your good to go. Now after thinning you might be tempted to think this isn't enough cotton, this thing will leak but it won't the cotton swells when wicked and fills the wells up so there is no leaking.
View attachment 103819

Side view showing the tails just touching the bottom of the juice wells.
View attachment 103820

I really hope this helps anyone who is battling with their Ammit 25 because eveyone should enjoy this amazing single coil RTA. #flavourflave
Thanks for the very detailed and informative post. I really do appreciate it.
It would seem that I'm able to get much more cotton through initially than I'm actually supposed to.
Even on 3mm I'd have to trim down to almost 50% before I could put the cotton in the juice holes instead of stuffing it in.
Even though I don't own an Ammit anymore this is all still very useful information for me in general as I'm still learning "How to RTA" :)
 
Last edited:
@Rob Fisher, I tried to follow that process as best I could. I ended up with:
BCjgMD0.jpg

YKZMHmm.jpg

I put it together but it was still not quite there yet. My bad for not trimming it down enough.
I opened it up and trimmed it down a bit (shorter and narrower):
VFt4pno.jpg

VDTvNQa.jpg

BOOM! She vapes! :D
I think with a little bit of practice I should be able to get this right on the first try...
This is basically how I wicked mine out of the box and have been happily vapeing with out leaks or dry hits since!
 
I know this is not relevant to the Ammit 25mm, however I thought I'd post here because I am considering upgrading my mod and getting the Ammit 25mm.

Quite new to vaping and sitting on a Pico 75w currently. Quit cigs and started out with a SMOK AIO about 2 months ago. A friend recently gave me a Pico 75w free.

Purchased an Ammit 22mm cause my Melo 3 had an awful metal taste to it and got tired of paying too much for coils.

Firstly, using a RTA was new to me. I watched more videos than I could care for on youtube about RTA's, wicking, coils etc and decided on this RTA. First three times I screwed up with the build as I put either too much or too little cotton which would yield dry hits, bad wicking and a leaking RTA which put me off and I almost gave up on DIY and RTA tanks.

I eventually got the cotton right, no more dry hits or leaking and really loving my Ammit 22mm. Vaping at 35w and such a satisfying experience.

At first I had an issue with wicking - bubbles got stuck at the juice flow holes and that's when I got dry hits after a few hits. Cannot use a high VG juice with this tank. It's not spacious enough to allow proper wicking with high VG juice. Max is 70/30.

My question is : Does the Ammit 25mm have enough space to allow for easy wicking and chain vaping? It seems RTA's require precision building otherwise they leak / give dry hits.
 
Hey guys,just started up my Ammit 25 today after much build up of courage,flavour is exceptional,nice clouds as well,half a tank finished in about 15mins,using a DNA coil Alien 2*26/38 KPN80 coming out at 0.15ohms at 40w,only gripe is when I closed the airflow to refill,then opened it again it started leaking bad,also it shows 0.15ohms but when I fire it jumps to 0.33ohms,what do you think the problem is? @Rob Fisher and others

IMG_20170903_092647.jpg IMG_20170903_093745.jpg
 
@Slick jumping resistance is a sign that the coil isn't screwed down tight... not sure why closing and opeing the juice flow after a refil it would leak... is the tank all nice and closed tight... not slightly open?
 
@Slick jumping resistance is a sign that the coil isn't screwed down tight... not sure why closing and opeing the juice flow after a refil it would leak... is the tank all nice and closed tight... not slightly open?
Ok after I changed batteries it asked 'new coil' so I said yes,now its stuck on 0.33ohms,so thats sorted,the tank is closed down good,do u think I put too much cotton to make it leak? Its resting now so il give it another go after breakfast
 
Ok after I changed batteries it asked 'new coil' so I said yes,now its stuck on 0.33ohms,so thats sorted,the tank is closed down good,do u think I put too much cotton to make it leak? Its resting now so il give it another go after breakfast

It's been a while since I played with my Ammit's... let's see how you go after breakfast..
 
Hey guys,just started up my Ammit 25 today after much build up of courage,flavour is exceptional,nice clouds as well,half a tank finished in about 15mins,using a DNA coil Alien 2*26/38 KPN80 coming out at 0.15ohms at 40w,only gripe is when I closed the airflow to refill,then opened it again it started leaking bad,also it shows 0.15ohms but when I fire it jumps to 0.33ohms,what do you think the problem is? @Rob Fisher and others

View attachment 106217 View attachment 106218
You mention in your post you closed the airflow when refilling. You should be closing the juice flow.
 
Ok after I changed batteries it asked 'new coil' so I said yes,now its stuck on 0.33ohms,so thats sorted,the tank is closed down good,do u think I put too much cotton to make it leak? Its resting now so il give it another go after breakfast

Checklist:
  • Trim coil leads so there is no contact with chimney. (You'll notice this when trying to screw on the chimney)
  • Trim cotton length so that it just touches the bottom of juice port.
  • Use a paperclip of similar pointed object to fine tune the wick position after juicing up the wick, make sure it's not touching any of the side or bottom air intake holes.
Hope this helps a bit.
 
You mention in your post you closed the airflow when refilling. You should be closing the juice flow.
Was I supposed to close the juice flow and airflow when filling? Then open up both after its filled?
 
Checklist:
  • Trim coil leads so there is no contact with chimney. (You'll notice this when trying to screw on the chimney)
  • Trim cotton length so that it just touches the bottom of juice port.
  • Use a paperclip of similar pointed object to fine tune the wick position after juicing up the wick, make sure it's not touching any of the side or bottom air intake holes.
Hope this helps a bit.
Initially thats what happened,I could not screw the chimmey back on,so I pressed the leads in abit and then it closed,I have a feeling I used too much cotton,for now the leaking has stopped,will monitor it,thanks for the advice guys
 
Back
Top