Ohm’s Law for Vapers: Breaking it Down Old Goat Style

Old_Goat

Experienced Vaper
LV
7
 
Joined
27/4/23
Posts
229
Awards
5
Age
42
Location
Johannesburg
Hey folks!
:goat:


So, I’ve heard it time and time again: “You gotta understand Ohm’s Law if you’re gonna build or install coils.” But, does anyone ever really take the time to break it down for us? Nah, they just throw some formulas at us and walk away. Well, fear not, because your buddy Old Goat is here to make this as simple and relatable as possible.

Let’s dive in, shall we?
:metal:


1. What is Ohm’s Law?

Alright, let’s start with the basics. Ohm’s Law is like the holy grail for anyone messing with electricity, and that includes us vapers. It’s a simple formula that helps you understand the relationship between voltage (V), current (I), and resistance (R). Think of it as the golden triangle of vaping—get this right, and you’re in for some seriously good clouds.

The formula is: V = I x R

Or, more practically for us:

  • Voltage (V): This is the power coming from your mod or battery. It’s like the juice in your vape setup.
  • Current (I): This is the flow of electricity through your coil. Think of it like the amount of vapor you’re trying to pull out of that delicious e-juice.
  • Resistance (R): This is the opposition to the current in your coil, measured in ohms (Ω). It’s like the barrier your electricity has to pass through.

2. Why Should You Care?

Alright, let’s get real. You might be thinking, “Old Goat, I just want to blow some clouds and taste that sweet, sweet flavor. Why do I need to know this?” Well, here’s the deal:

  • Safety First: Understanding Ohm’s Law helps you avoid building coils that are too low in resistance, which could potentially overload your battery and cause dangerous situations. We don’t want any exploding mods here!
  • Better Performance: Knowing how to balance voltage, current, and resistance helps you get the most flavor and vapor out of your setup without frying your coils or burning your juice.
  • Battery Life: You’ll understand how to build coils that won’t drain your battery too quickly. More vape time, less charging!

3. Breaking Down the Formula

Let’s break it down with a simple analogy. Imagine you’ve got a garden hose:

  • Voltage (V) is the water pressure coming out of the tap.
  • Current (I) is the water flowing through the hose.
  • Resistance (R) is like the diameter of the hose—smaller hose, more resistance.
Scenario 1: Big resistance, small current. Think of a tiny straw with high water pressure. Not much water (vapor) is going to get through.

Scenario 2: Low resistance, big current. Now, you’ve got a fire hose with high water pressure. Lots of water (vapor) coming through, but if your pressure is too high, that hose (coil) might burst.

4. Let’s Get Practical: Building Coils

When you’re building or installing coils, here’s what you need to keep in mind:

  • Sub-Ohm Vaping: Anything below 1.0 ohms is considered sub-ohm. This gives you big clouds and intense flavor, but it pulls more current from your battery. Make sure your mod and battery can handle it!
  • Higher Ohm Coils: Above 1.0 ohms, you’re looking at less current and less vapor. This is great for mouth-to-lung (MTL) vapers who want a more cigarette-like experience and better battery life.
Quick Tip: Use an ohm reader to check your coil’s resistance before firing it on your mod. Always.

5. The Power Triangle

We also have another formula called the Power Triangle to understand how much wattage (P) you’re getting:

P (Wattage) = V (Voltage) x I (Current)

In our world, wattage determines how hot your coil gets and, consequently, how much vapor and flavor you’ll produce. More wattage usually means more heat, more vapor, but it also means you need to be more cautious with your builds.

6. Practical Example

Let’s say you’ve built a coil that reads 0.2 ohms (R), and you’re using a fully charged battery that puts out 4.2 volts (V).

Using V = I x R:

4.2V = I x 0.2Ω

Solving for current (I), we get:

I = 4.2V / 0.2Ω = 21 Amps

That’s a lot of current! Make sure your battery can handle it. If your battery’s maximum discharge is 20A, you’re pushing it right to the limit. Be careful!

7. Conclusion: Vape Safe, Vape Smart

So there you have it, folks! A quick and dirty rundown of Ohm’s Law and why it matters for us vapers. Remember, understanding this stuff not only keeps you safe but also helps you get the best performance out of your gear.

Go out there, build safely, and keep chasing those clouds.
:goat:


Feel free to ask any questions or share your experiences. Let’s keep the community informed and safe.

Stay cloudy, my friends!
 
Hey folks!
:goat:


Let’s take it a step further and talk about what happens when things go sideways—when you miscalculate or push your builds to the edge.

Scenario: My 0.07-Ohm Coil Disaster

So, picture this: I built a coil that came out to a 0.07-ohm resistance. I slapped it on my trusty Target 200, a regulated dual-battery mod that easily pushes beyond the required 60 watts for this coil, but it wouldn’t fire. Frustrated, I tried my Dovpo MVV, another dual-battery mod, and while it did fire, I was caught in a cycle of either too little flavor or burning lungs.

The real kicker? Both my RDA and mod got ridiculously hot. Needless to say, that coil didn’t last long before I swapped it out for something more manageable. But what went wrong, and what could’ve gone worse? Let’s break it down.


1. Why Did My Regulated Mod Refuse to Fire?

Regulated mods like the Target 200 are designed with safety features to protect both the device and the user. One of these features is a minimum resistance limit, typically around 0.1 to 0.2 ohms, depending on the mod.

Here’s why my mod refused to fire at 0.07 ohms:

  • Safety Threshold: Most regulated mods won’t fire below a certain resistance because of the increased current draw and potential for battery strain or even failure.
  • High Current Demand: At 0.07 ohms, the coil demands a significant current which could exceed the mod’s capability or safe operating limits.
Formula check:

If my mod was set at 4.2 volts (standard fully charged battery):

I = V / R = 4.2V / 0.07Ω = 60 Amps!

Most mod batteries can’t safely handle more than 20-30 amps continuously. 60 amps is way beyond safe limits, hence the refusal to fire.


2. Why Did My Unregulated Mod Heat Up?

Moving to the Dovpo MVV, which is more of an unregulated power-horse, I could get the coil to fire, but not without issues.

Here’s why it got hot:

  • Increased Power Draw: The lower the resistance, the higher the current drawn. More current means more heat, not just in the coil but in the mod and batteries too.
  • Insufficient Cooling: Most mods are not designed to dissipate the amount of heat generated by such high current.
  • Battery Stress: Pushing the batteries to deliver more current than they’re rated for leads to heat buildup, risking battery damage or worse.
Dangerous Power Levels:

If I was trying to get a decent vape out of it, I might have cranked up the voltage:

P = V^2 / R = (4.2V)^2 / 0.07Ω = 252 Watts!

No wonder things were getting toasty. High wattage can lead to burnt coils, ruined e-liquid, and dangerously hot batteries.


3. The Risk of Low Resistance Coils

Going too low in resistance isn’t just about bad vape quality. It can lead to serious safety hazards:

  • Battery Overload: Drawing too much current from your batteries can cause them to overheat, vent, or even explode.
  • Mod Damage: Continuous high power draw can damage your mod’s internal circuitry, leading to malfunctions or total failure.
  • Burns and Injuries: Hot mods and RDAs are a burn hazard. Imagine that heat against your lips or hands.

4. What Could Have Gone Wrong if I Pushed On?

Had I ignored the warning signs and continued, things could have gone downhill quickly:

  • Battery Failure: Overheating batteries can lead to a phenomenon known as “thermal runaway,” where the battery rapidly heats up and potentially vents or explodes.
  • Component Damage: High current and heat could fry the internals of my mod, destroy my RDA, and even lead to short circuits.
  • Health Risks: Inhaling burnt cotton or overheated e-liquid is not only unpleasant but potentially harmful to your lungs.

5. How to Avoid These Issues

  • Know Your Limits: Understand the resistance and current limits of your mods and batteries. Stick to coils within safe operating ranges.
  • Use Ohm’s Law: Calculate the expected current and wattage for your builds. If it looks too high, it probably is.
  • Safety First: If your mod refuses to fire, there’s a reason. Don’t bypass safety features just to get a hit.
  • Monitor Heat: If your mod or RDA gets hot to the touch, stop using it immediately and check your setup.

Conclusion: Play It Safe

Vaping is fun and building your own coils is a great way to customize your experience, but always respect the principles of Ohm’s Law. Keep your builds within safe limits, and never push your equipment beyond what it’s designed for.

Stay cloudy, but most importantly, stay safe!
:goat:


Feel free to share your experiences or ask questions below. Let’s keep learning together and ensure we’re all vaping smart and safe.

There you go, folks! I hope this helps you understand the potential pitfalls of pushing your builds too far. Vape on, and keep those clouds coming, but always with safety in mind!
 
Hey again, fellow vapers! We’ve already covered the basics of Ohm’s Law and how it applies to our vape builds in the last two posts. Today, we’re going to dig deeper into single and dual coil setups.

Recap: Ohm’s Law Basics​

Quick refresher: Ohm’s Law helps us understand the relationship between voltage (V), current (I), and resistance (R). The basic formula is:

Ohm.png

For vaping, this helps us determine how much power is going through our coils, which in turn affects the flavor, vapor production, and safety of our builds.

Single Coil Setups: Simple and Sweet​

In a single coil setup, you have just one coil doing all the work. The resistance is straightforward: it’s whatever your coil measures. If your single coil reads 2.0 ohms, then your mod sees 2.0 ohms. Easy peasy, right?

Key Takeaway: One coil, one resistance. What you measure is what you get.

Dual Coil Setups: Double the Fun, Double the Math​

Now, let’s talk about dual coil setups, which are a bit more complicated but also a lot of fun for those who love big clouds and rich flavors. Most atomizers are designed to install your coils in parallel, meaning they share the voltage from your mod and the current splits between them.

Parallel Coils and Resistance:

When you install two coils in parallel, you don’t just add their resistances together. Instead, you calculate the total resistance using this formula:

2 coil 1.png

For example, if you have two coils, each at 2.0 ohms:

2 coil 2.png

So, with two 2.0 ohm coils, you end up with a total resistance of 1.0 ohms. This is because the electricity has two paths to travel, reducing the overall resistance and making it easier for the current to flow.

Key Takeaway: Two coils in parallel cut the resistance in half (if they’re the same resistance).

Series Coil Setups: A Rare Beast​

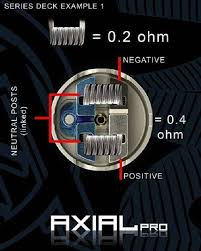
Series coil setups are less common but worth a mention. Here, the coils are connected end-to-end, and the resistances simply add up.

Series Coils and Resistance:

In series, the formula is straightforward:

2 coil 3.png

So, if you have two 2.0 ohm coils:

2 coil 4.png

The current has to go through both coils in a single path, increasing the total resistance.

Key Takeaway: In series, resistances add up, leading to higher total resistance.

Conclusion​

Understanding how coil configurations affect your vape setup is crucial for safety and performance. Whether you’re a flavor chaser or a cloud enthusiast, knowing how to build your coils and manage your resistance can make all the difference in your vaping experience.

Stay safe, and happy vaping!
 
Last edited:
how on earth would you do coils in series?

I have seen some builds where people do say 5 turns, then take the one leg and make another 5 loops again to create a 10 loop coil to create more resistance but the only way I can think of coils in series is if the build deck supports it.
 
how on earth would you do coils in series?

I have seen some builds where people do say 5 turns, then take the one leg and make another 5 loops again to create a 10 loop coil to create more resistance but the only way I can think of coils in series is if the build deck supports it.
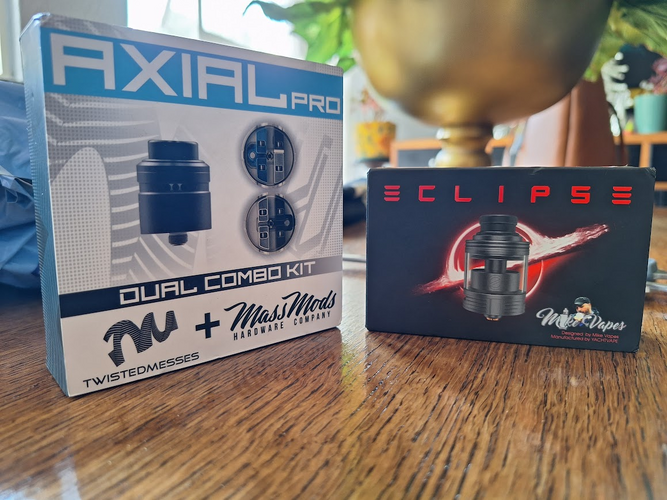
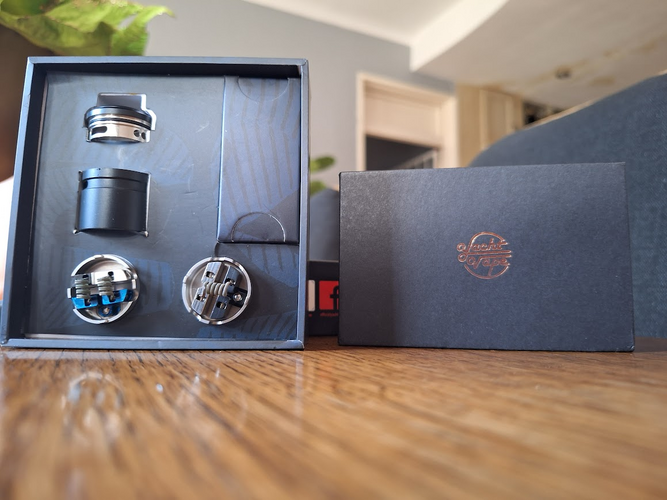
Ah, but you see, there is an RDA out there called the AXIAL Pro by Twisted Messes that comes with 2 build decks in the box. One is a standard parallel deck and the other is a series deck.

Series decks are not very common, but they do exist.

1719497372683.png

1719497416454.png

1719497596773.png
 
that is facinating.

so you could use thinner wire, with more windings and create a duel coil MTL et up for nic salts if you wanted to.

but that would be silly
 
Back
Top