Show Us Your Working Wick And Coil Setup

Status
Not open for further replies.
Ithaka quad coil setup
Check out this video on YouTube:


@Matthee, you wanted to see this?
Not my neatest. It works like a charm though.
The 2mm wick is too thick to make this work. Did it with 1mm. They wick a little slower. Next stop is to try with ekowool on duel coil. Mission is to get ekowool. @Derick,
@Gizmo (hint-hint)
Finished the tank of gambit, and now on a custard juice. Still a strong presence of the gambit between the custard.

Cant wait for those heather juices to be delivered. will tone them down to roughly 0.9 or 0.8 ohms.
 
Last edited:
Nice vid @CraftyZA - did I spot a Guinness in the background round the 0:47 mark?
Spot on!!
They say with vaping we need to keep the whistle wet all the time!!
My pineapple beer was a failure, so bought some of this. Will chat to you before i start my marula beer.
 
Just waiting for the temperature to drop a bit, then I'l start another Guinness / Murphy's clone home brew.
 
I thought heat was ideal for yeast debelopment?

Nooo! each type of yeast have a different temperature range & limit; most ale yeasts between 18C to max 25C, lager yeasts between 8C to max 13C - below the temperature threshold and yeast doesn't develop and above threshold and you get nasty off flavours. Black ales like stout (i.e Guinness) optimal temp 18C.
 
Nooo! each type of yeast have a different temperature range & limit; most ale yeasts between 18C to max 25C, lager yeasts between 8C to max 13C - below the temperature threshold and yeast doesn't develop and above threshold and you get nasty off flavours. Black ales like stout (i.e Guinness) optimal temp 18C.
Oh wow. I just did what my old man used to do. So out of curiosity, fruit beers like marula or pineapple, what type of yeast would be in that? I'm hoping with the marula i can make something like chikoto that was available in the early 90's
Around 4% of the good stuff is what i'm hoping for.
 
For fruit beers, normally our boere use instant dry yeast available off-the-shelf at Spar, Checkers etc, but if you really want to make a stunning fruit beer and consistent with every brew I can p.m you with contact detail where you can get proper beer yeasts. To calculate the final ABV % depends on the quantity of sugar you add to your brew. Next time I do a home brew, you must pop over and I show you all the essential detail.
 
Oh wow, just when i thought i was starting to get the hang of things regarding coils and vaping, you chaps start talking about yeast temperatures! Oh no

Lol, only kidding. Great to see other hobbies that require attention to detail and passion
 
1. Rip Tripper takes out the rubber grommet. He was using a 50/50 juice. Do you guys do the same? I thought the rubber grommet was important for flooding and gurgling issues.

2. How long does the cotton wick last? The whole point of doing this rebuild for me would be to get better performance out of my PT2Mini but also for it to last a while. If i have to rebuild or fiddle every day or two because of a worn out wick then that would irritate me.

3. @Tom perhaps this question is directed at you. What coild resistance do you think one should aim for to use it on a vision Spinner? Not sure of the Spinner's max amps.

Am really keen to try this out. Also makes me think of @SVS1000 's tutorial a while back.

1. nope, I did not make any changes to the original setup. I had no liquid flow issues whatsoever. Not one dry hit in a few weeks of usage.

2. I have 3 custom builds in operation. The first one I did the day after the vape meet, the second lot last week. i have not changed the cotton yet. if i change the cotton i will make a new coil as well. that was my philosophy behind that. however, I wash the coils in the Ultrasonic bath. No issue with the washed cotton.

3. I am using the Spinner only for the last few days, and I aimed for 1.5 ohms for the standard Evod batts. I wanted a better vape for those. 1.4 ohms works as well. will keep it that way for flexibility.
 
Thanks for the reply @Tom. So just to confirm then, you are still using the rubber grommet as is.

I will try one out and report back
 
Ithaka quad coil setup
Check out this video on YouTube:


@Matthee, you wanted to see this?
Not my neatest. It works like a charm though.
The 2mm wick is too thick to make this work. Did it with 1mm. They wick a little slower. Next stop is to try with ekowool on duel coil. Mission is to get ekowool. @Derick,
@Gizmo (hint-hint)
Finished the tank of gambit, and now on a custard juice. Still a strong presence of the gambit between the custard.

Cant wait for those heather juices to be delivered. will tone them down to roughly 0.9 or 0.8 ohms.

Thanks @CraftyZA. That space it tight! Kudos for being able to fit quad coils in there. Must kick a** at that resistance. HHV tobaccos does well at 0.8 ish for me.
 
Thanks @CraftyZA. That space it tight! Kudos for being able to fit quad coils in there. Must kick a** at that resistance. HHV tobaccos does well at 0.8 ish for me.
It is 0.4 ohm, but it is not as harsh as you will imagine. Air is wide open, and juice controll it about 50% open. Tons of flavour!! And not harsh at all!
 
It is 0.4 ohm, but it is not as harsh as you will imagine. Air is wide open, and juice controll it about 50% open. Tons of flavour!! And not harsh at all!
Oh, yes. I did not mean kick as in the harsh sense of the word. And 5P just loves high heat. Absolute Pin is just totally different and much better on dual coils at around 0.6 ohms, for example. But, yet to come across a "natural" fruit juice (without having cream of something sweet added) that can take heat much below 1.o ohms.
 
Ok, here goes, my second coil on the IGO-L dripper
Did it yesterday (Saturday)

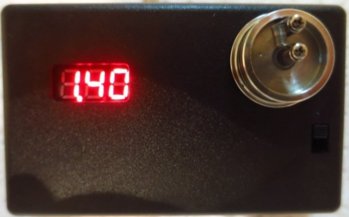
I was aiming for 1.4 ohms based on suggestions from various folk. My previous one was 1.7 ohms.

What I did was use a smaller diameter screwdriver. I measured it - was approximately 1.5 mm. Also compared it to a 1.5mm drillbit and it looked identical. Did 9 wraps instead of 10.

Came out at exactly 1.40 ohms.

Wire - Kanthal 28g
ID: 1.5mm
Wraps: 9

2nd_coil_1.jpg
Couldn't believe it - came out exactly where I wanted it. I thought I would have to do several attempts

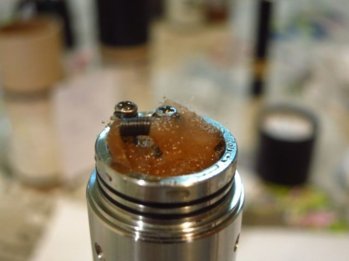
2nd_coil_2.jpg
Cotton wicked - all juiced up - ready to vape


Verdict
- I'm not so sure. Well, the positives are that it definitely heats up a bit faster than my old coil (1.7 ohm 2mm ID 10 wraps). I also have picked up maybe slightly more throat hit than before, but its probably my imagination
- On the negative side, the smaller 1.5mm diameter means I use a smaller piece of cotton. I have found the cotton dries out quicker - as I am sure it would, being less volume of cotton.
- Also, may be my imagination again, but the flavour is not as flavoursome, slightly less, ever so slightly. I tried to position the coil similarly to my last build. Maybe a slight change in position is what I'm observing.

Strangely, I thought the 1.4 ohm would be quite a lot better, but actually I think I preferred the previous 1.7 ohm set up. I need to vape it more though and change cotton a few times to really make up my mind. But it's definitely not a major improvement to my old setup. If anything, a slight downgrade.

All other variables are equal. Still on the SVD at 12.5 Watts. 5Pawns Bowdens Mate doing the honours.
 
12.5 watts stays 12.5 watts on the SVD. it should make a bigger difference if you compare the 2 setups on the mech mods. there the resistance will influence the wattage drastically.
Did you put the airhole same position to the coil as previously, and is the coil in the same distance on the posts? that influences the TH and vapor production. btw, I am doing 2mm inner dia mostly, only in the Evod rebuilds I am doing 1.5mm.
 
I think that with using a smaller ID the amount of wick going through the coil is less, thus less juice which could contribute to less flavour. Try building 2 coils, one at 1.7 and one at 1.3 but both need to have the same ID and then do a comparison.
 
12.5 watts stays 12.5 watts on the SVD. it should make a bigger difference if you compare the 2 setups on the mech mods. there the resistance will influence the wattage drastically.
Did you put the airhole same position to the coil as previously, and is the coil in the same distance on the posts? that influences the TH and vapor production. btw, I am doing 2mm inner dia mostly, only in the Evod rebuilds I am doing 1.5mm.

Thanks @Tom, understand you. On the mech mod is where the coil resistance plays a big role. Not so much on a regulated mod at the same power setting. I havent played much with the mech mod yet, since it attacked me at the vape meet ;-) But I will get there. Just a quick calculation, you are right. At say 4.0 volts of battery, the 1.4 ohm coil would translate to around 11.4 Watts. The 1.7 ohm to around 9.4 Watts.

To answer your questions, yes, I did put the airhole in the same position relative to the coil as previously. I tried to get the coil positioned very much in the same way as my previous build. But on closer inspection of the photos, I think this coil was slightly further away from the posts than my previous one.

Thanks for your input on the coils. Am going to try a PT2 coil rebuild next
 
Oh my hat, looking at some of your guys awesome work, I ma almost shy to post this. Anyways, my first attempt at building coils. Thanks to Zegee who sold me a Aqua RBA and then also gave me some Kanthal Wire.

Using 28awg with 8 wraps(I think), the resistance came out to 1.1. Vaping it at 6.0 watts produced nice vapor but I pushed it up to 7.0 and it is awesome. Anyways, here is a few pics. I know practice is needed and would appreciate any advice from all you legends.

Build%20One.jpg

Messy I know.

Build%20One%20Burn.jpg

They heat up rather nicely. But still a bit messy on the coil.

Build%20One%20Cotton.jpg

The vapor produced at 6.0 watts. Using my iTaste VV/VW V3. Thanks guys, please give me some pointers on how to get the coils neater and an easier way to hook those bugger on the posts. Thanks y'all.
 
I think that with using a smaller ID the amount of wick going through the coil is less, thus less juice which could contribute to less flavour. Try building 2 coils, one at 1.7 and one at 1.3 but both need to have the same ID and then do a comparison.

Thanks @BhavZ, that's a great suggestion. I will try using the same ID but varying the number of wraps to change the resistance.
 
Hey @Chop007 - I am no expert, only built 3 coils in my time, he he
If it works, then I say great! You are doing it right!

But what are you wrapping those coils around?
Once wrapped, before wicking, you can do the "tweezer squeeze" to get the coils closer together - you get the coils red hot, then let go the fire button, then squeeze the coil together with tweezers. Do it a few times.

Also, amazing that the iTaste VV fires that coil at 1.1 ohms.
 
Ok, here goes, my second coil on the IGO-L dripper
Did it yesterday (Saturday)

I was aiming for 1.4 ohms based on suggestions from various folk. My previous one was 1.7 ohms.

What I did was use a smaller diameter screwdriver. I measured it - was approximately 1.5 mm. Also compared it to a 1.5mm drillbit and it looked identical. Did 9 wraps instead of 10.

Came out at exactly 1.40 ohms.

Wire - Kanthal 28g
ID: 1.5mm
Wraps: 9

View attachment 1643
Couldn't believe it - came out exactly where I wanted it. I thought I would have to do several attempts

View attachment 1644
Cotton wicked - all juiced up - ready to vape


Verdict
- I'm not so sure. Well, the positives are that it definitely heats up a bit faster than my old coil (1.7 ohm 2mm ID 10 wraps). I also have picked up maybe slightly more throat hit than before, but its probably my imagination
- On the negative side, the smaller 1.5mm diameter means I use a smaller piece of cotton. I have found the cotton dries out quicker - as I am sure it would, being less volume of cotton.
- Also, may be my imagination again, but the flavour is not as flavoursome, slightly less, ever so slightly. I tried to position the coil similarly to my last build. Maybe a slight change in position is what I'm observing.

Strangely, I thought the 1.4 ohm would be quite a lot better, but actually I think I preferred the previous 1.7 ohm set up. I need to vape it more though and change cotton a few times to really make up my mind. But it's definitely not a major improvement to my old setup. If anything, a slight downgrade.

All other variables are equal. Still on the SVD at 12.5 Watts. 5Pawns Bowdens Mate doing the honours.
Neat coiling, @Silver1. Methinks that is too close to the posts. The closer you put the coil to the edge, the nearer the air hole it can be, the better the flavour. Yes, will give slightly more of a throat hit so near to the posts, but rather move the coil up to adjust for more throat hit - start directly in front of the air hole, then move up if required. More like this:
VutQedF.jpg

Or even like this:
GyStv4B.jpg
 
Oh my hat, looking at some of your guys awesome work, I ma almost shy to post this. Anyways, my first attempt at building coils. Thanks to Zegee who sold me a Aqua RBA and then also gave me some Kanthal Wire.

Using 28awg with 8 wraps(I think), the resistance came out to 1.1. Vaping it at 6.0 watts produced nice vapor but I pushed it up to 7.0 and it is awesome. Anyways, here is a few pics. I know practice is needed and would appreciate any advice from all you legends.

Build%20One.jpg

Messy I know.

Build%20One%20Burn.jpg

They heat up rather nicely. But still a bit messy on the coil.

Build%20One%20Cotton.jpg

The vapor produced at 6.0 watts. Using my iTaste VV/VW V3. Thanks guys, please give me some pointers on how to get the coils neater and an easier way to hook those bugger on the posts. Thanks y'all.
Here is a good video on building micro coils - for a micro coil all the wraps should all tightly touch. When installing on the Aqua, keep the coil on the mandrel, and hold in position with one hand. Work the tails from the inside of the posts and wrap the tail right around so that it stays in position by itself - tighten the screw slightly leaving enough space for the tails of the second coil. Now follow the same procedure with the second coil. Tighten the screws but not all the way. Position the coils with your mandrel to make sure they are right above the air holes, as close as possible without touching the deck. Now tighten the screws fully. Good way to tighten is by leaving the mandrel in and holding the mandrel to prevent the coil from too much movement during tightening. That is how I do it, but there are many other ways.
 
Status
Not open for further replies.
Back
Top